Protect your home with 8 residential roofing best practices. Learn about storm-ready materials, proper ventilation, and documenting damage for insurance.

Central Texas roofs take a beating. Between hail storms rolling through Cedar Park, UV exposure baking shingles in Steiner Ranch, and wind-driven rain hammering homes across Austin, your roof deals with more than most homeowners realize. Knowing the right residential roofing best practices makes the difference between a roof that holds up for decades and one that fails years before it should.
The problem is, most roofing advice online is generic. It doesn't account for the specific climate, building codes, and material considerations that matter here in Central Texas. What works in the Pacific Northwest or the Midwest won't necessarily protect your home on a 105°F August afternoon in Leander.
At Defend Roofing, we're a father-and-son team with three generations of roofing experience in this region. We've inspected and replaced thousands of roofs across the Austin area, and we've seen firsthand what happens when corners get cut, and what happens when the job is done right. Every project we take on starts with our 100+ photo Precision Roof Assessment, so we know exactly what we're working with before recommending a single thing.
This article breaks down eight roofing best practices that actually matter for Central Texas homeowners. Whether you're planning a full roof replacement, dealing with storm damage, or just want to make sure your current roof is in good shape, these are the standards worth knowing, and the ones we hold ourselves to on every job we take.
A roof assessment isn't a quick glance from the driveway. A real precision assessment means a contractor gets on your roof, documents every section with detailed photos, and gives you a written record of what they found. This is the foundation of any responsible residential roofing best practices approach, because you can't make smart decisions about repair or replacement without knowing exactly what condition your roof is in.
Every precision assessment should cover each surface, edge, flashing point, and penetration on your roof. Your inspector needs to document nail pops, lifted shingles, granule loss, and cracked flashing, along with any soft spots in the decking beneath. That photo record protects you during insurance claims, helps you compare contractor quotes on equal footing, and gives you proof if a dispute comes up later.
Without photo documentation, you're taking a contractor's word for the condition of your roof, and that's a position no homeowner should be in.
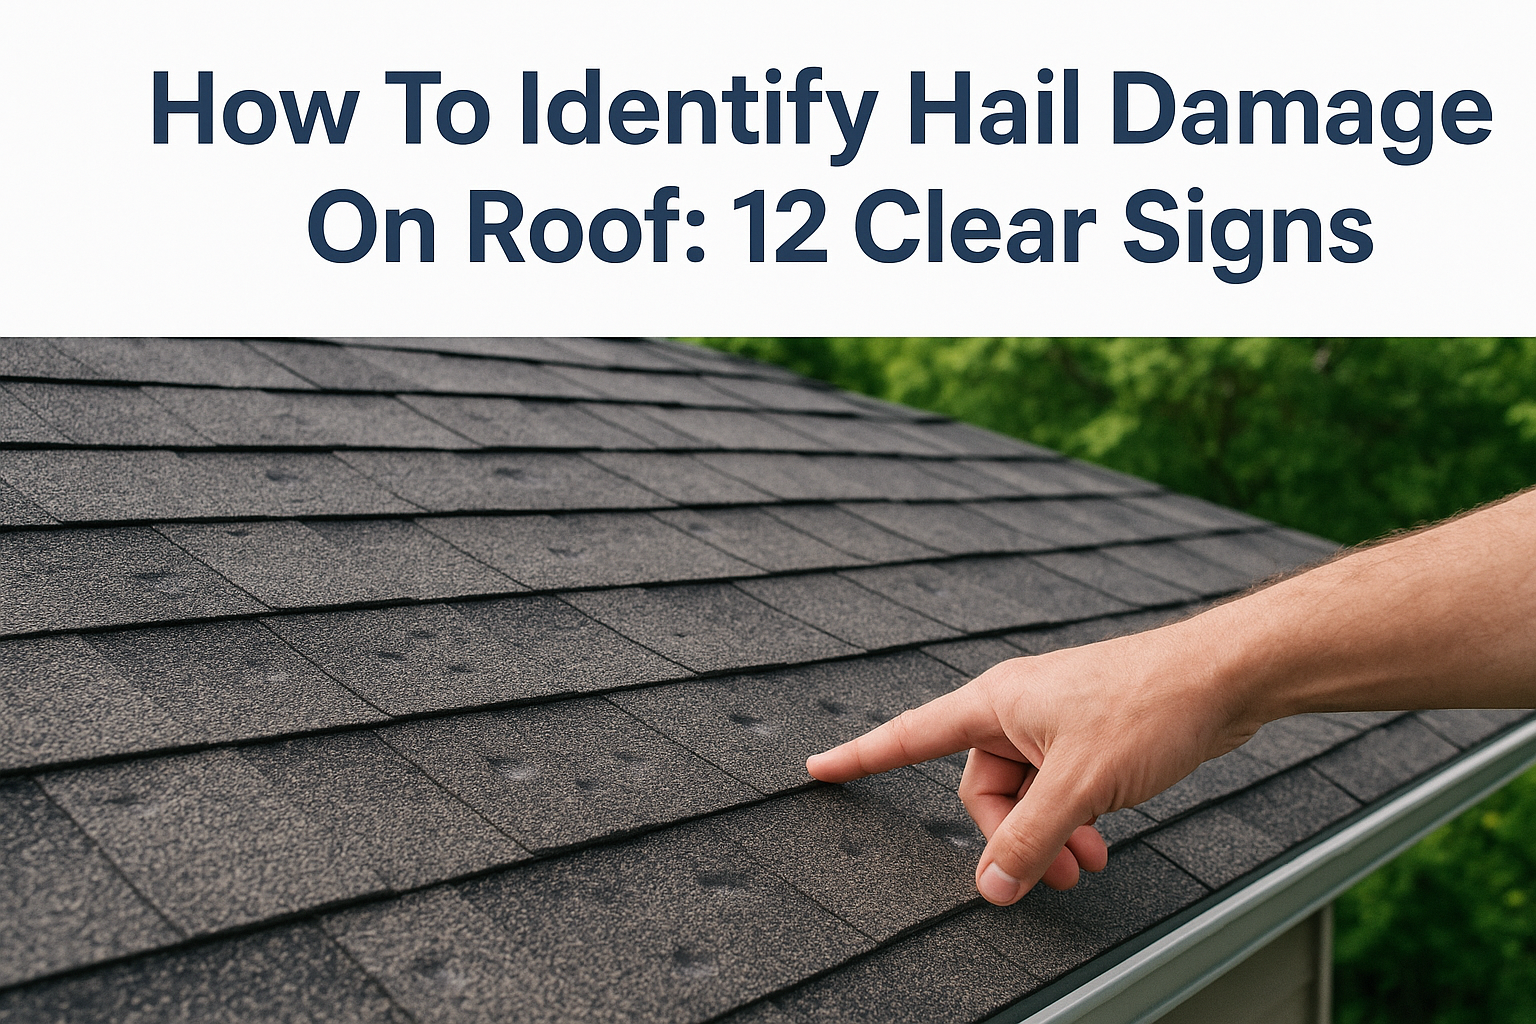
Central Texas storms regularly cause hail damage that's invisible from the ground. Hail hits bruise asphalt shingles and break down the granule layer without visibly cracking the surface. Your contractor needs to recognize hail impact patterns up close and document them clearly for your insurance adjuster, or you risk a denied claim on damage that's genuinely there.
You can do a preliminary scan without climbing on the roof. From the ground and inside your attic, watch for these warning signs:
Any of these signs means you need a professional on the roof as soon as possible.
Many reputable contractors offer free initial assessments, especially following storm events. At Defend Roofing, every assessment includes 100+ photos and a straight recommendation on whether repair or replacement is the right call. Plan for 45 to 90 minutes on a standard-sized home.
The materials on your roof need to hold up against UV radiation, hail impact, and temperature swings that can top 100°F in summer. Choosing the wrong product for this climate shortens your roof's life significantly, regardless of how well it gets installed.
Material selection means choosing shingles, underlayment, and accessories rated for the specific stresses your roof faces here. In Central Texas, that means impact-resistant shingles rated Class 3 or Class 4 for hail resistance, along with products built to handle prolonged UV exposure without premature granule loss.
A Class 4 impact-resistant shingle can also qualify you for a discount on your homeowner's insurance premium in Texas, making the upgrade more affordable over time.
Look for shingles with an algae-resistant coating, since humidity in shaded and wooded lots creates conditions where black streaking develops quickly. Heavier-weight architectural shingles also perform better than three-tab options in the high-wind events common to this region, and they hold up far longer under repeated thermal expansion and contraction.
Pull out your existing warranty documentation and check the wind and impact ratings listed for your current shingles. If you no longer have that paperwork, your contractor can identify the installed product and pull up the specs directly.
Class 4 shingles typically run 10 to 20 percent more than standard options upfront, but insurance savings and a longer lifespan generally offset that difference within a few years. Applying these residential roofing best practices at the material selection stage pays for itself.
The edge of your roof and the underlayment beneath your shingles are your last line of defense against water intrusion. Most homeowners never see these layers, but skipping them creates slow leaks and rot that go undetected for years.
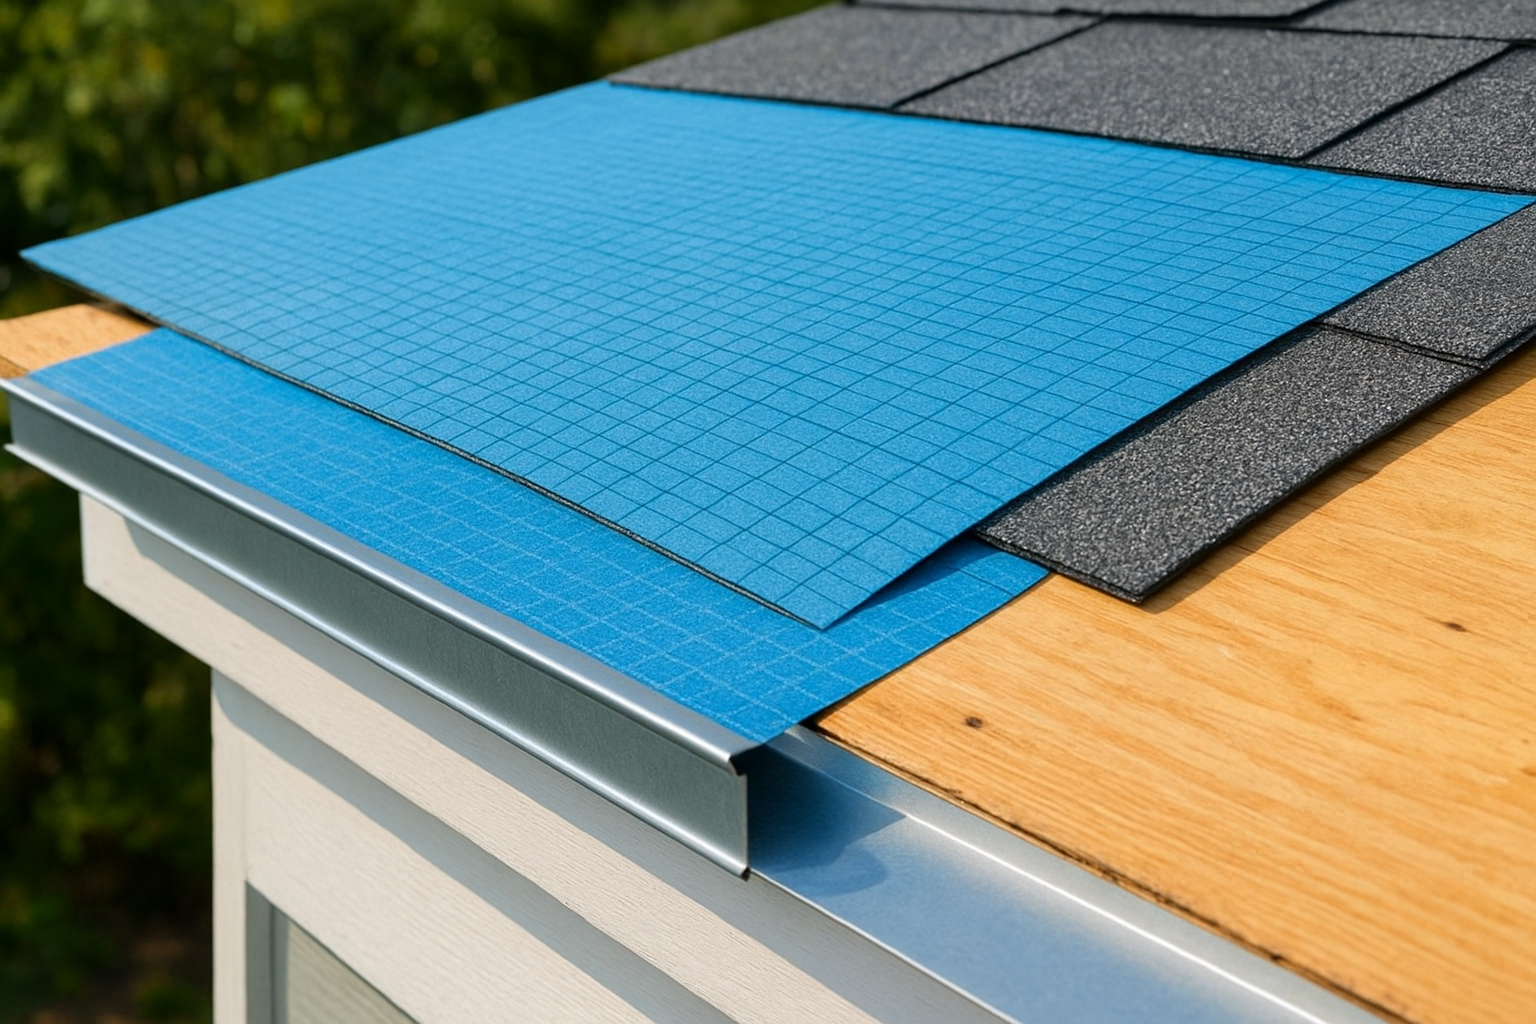
Underlayment is the water-resistant barrier installed directly over your roof decking before shingles go on. Drip edge metal runs along every eave and rake to direct water away from the fascia and into the gutters. These two components protect your home when shingles are compromised by wind, hail, or age.
Proper drip edge installation is required by the International Residential Code, and skipping it voids many shingle manufacturer warranties.
In Central Texas, use synthetic underlayment rather than traditional felt. Synthetic material resists tearing on hot roof decks and holds up far better under prolonged UV exposure.
Install drip edge at the eaves first, then lay underlayment over it, with the rake drip edge placed on top. This sequencing is critical for water to shed correctly off your roof during heavy rain events.
Check your gutters and fascia boards from the ground before calling a contractor. These warning signs suggest a missing or improperly installed drip edge:
Upgraded synthetic underlayment adds modest cost to a full replacement but protects your home for decades. Applying these residential roofing best practices at the edge level costs far less than repairing rotted decking or fascia later.
Flashing is the metal barrier installed wherever your roof meets a wall, chimney, vent, or any other structure that breaks through the surface. These intersections are where most roof leaks originate, and treating them as an afterthought is one of the most common and costly mistakes a contractor can make.
Flashing includes step flashing along walls, counter flashing over chimneys, and pipe boots around every penetration. Each one needs to be properly sized, overlapped, and sealed so water sheds away from the opening rather than into it. Poorly detailed flashing causes slow leaks that rot your decking and framing long before you see a water stain on your ceiling.
Proper flashing is a core residential roofing best practices requirement under the International Residential Code and a condition of most shingle manufacturer warranties.
The thermal expansion and contraction this region experiences puts significant stress on flashing seals over time. Specify high-quality butyl-based sealants rated for high-temperature environments rather than standard roofing caulk, which dries out and cracks after a single Texas summer.
From the ground or a ladder at the eave, look at your chimney base and pipe boots for lifted edges, rust staining, or cracked sealant. These are reliable early indicators of a compromised seal that needs professional attention before water finds its way inside.
Reflashing a chimney or set of penetrations during a full replacement adds minimal cost upfront. Skipping it risks interior water damage that can run into thousands of dollars in structural repairs down the road.
Shingle installation looks straightforward, but the details matter more than most homeowners expect. Nail placement, pattern, and depth are all specified by the manufacturer, and deviating from those specs creates a roof that fails far earlier than it should.
Every shingle product comes with an installation guide that specifies nail placement zones, fastener count, and required overlap. When a contractor drives nails too high, too low, or skips the required count, the shingles can lift in wind and lose the coverage that protects your decking below. This is a core residential roofing best practices standard that directly affects your warranty coverage.
Most shingle manufacturers void their warranty entirely if installation doesn't follow their published nailing specifications.
In high-wind zones across Central Texas, many manufacturers require six nails per shingle rather than the standard four. Your contractor should always confirm the wind rating requirements for your specific product and zip code before the first shingle goes down.
After installation, look at your completed roof surface from the ground for these warning signs:
Proper nailing adds no extra material cost to your project. It simply requires a contractor who follows the spec sheet every time rather than cutting corners on speed.
Your roof decking is the structural foundation that every other component sits on. When the decking is too thin, improperly fastened, or deteriorated, the entire system above it is compromised, no matter how good the shingles or underlayment are.
Roof decking is the layer of plywood or OSB panels nailed directly to your roof rafters. The minimum thickness required in most residential applications is 7/16-inch OSB or 15/32-inch plywood, and fasteners must be spaced correctly to meet both code and manufacturer requirements. Skipping this standard is one of the most overlooked failures in residential roofing best practices.
Decking that flexes underfoot during installation is a clear indicator that the panels are undersized or the fastening pattern is insufficient.
The heat and humidity cycles in Central Texas cause OSB panels to swell and buckle at the edges when they aren't gapped properly during installation. Your contractor should leave a 1/8-inch gap between panels to allow for thermal expansion, which prevents visible ridging on your finished roof surface.
Walk your attic after a storm and look for soft spots or visible sagging between the rafters. Any give in the sheathing underfoot means the decking needs replacement before new roofing goes on top.
Replacing damaged decking sections during a full reroof adds a per-sheet cost, but addressing it upfront saves you from pulling off new shingles later to fix the problem underneath.
Your attic directly affects how long your roof lasts. When heat builds up without a path to escape, it bakes your shingles from underneath, shortens the lifespan of your decking, and drives up your cooling bills every summer.
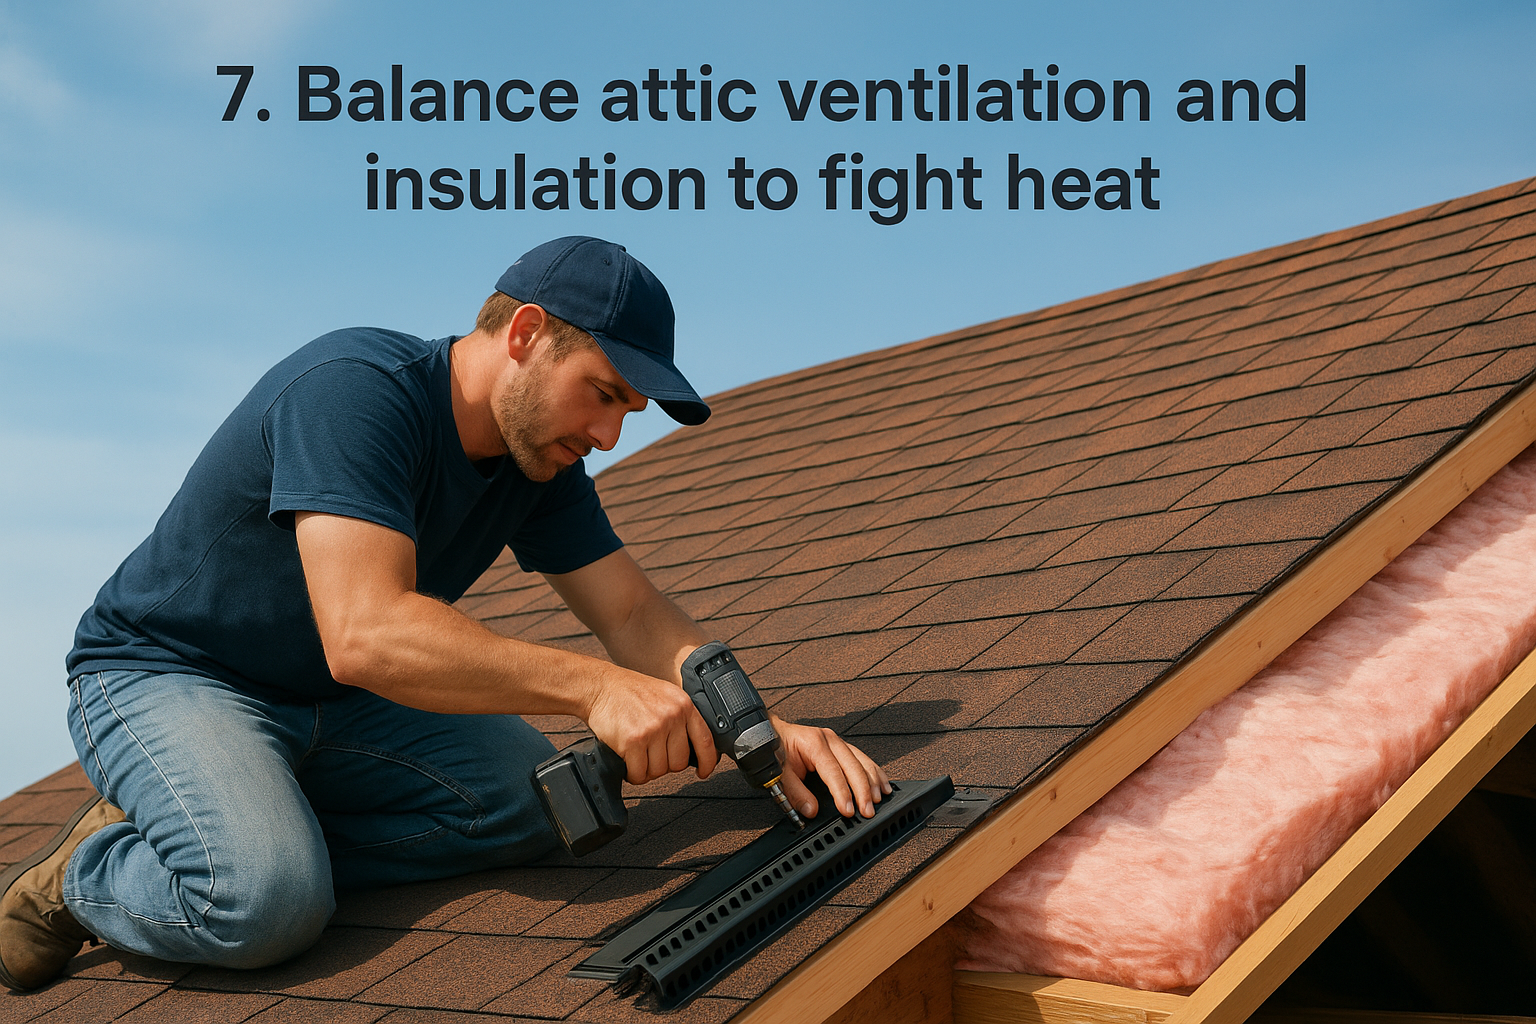
A balanced ventilation system combines intake vents at the soffits and exhaust vents at the ridge to move air continuously through your attic. Paired with proper insulation on the attic floor, this system keeps heat from transferring into your living space and prevents moisture from rotting your decking from the inside out.
Skipping proper ventilation is one of the fastest ways to void a shingle manufacturer's warranty.
In Central Texas, attic temperatures can exceed 150°F on a summer afternoon without sufficient airflow. Follow the standard guideline of 1 square foot of net ventilation per 150 square feet of attic floor space, split evenly between intake and exhaust points.
Go into your attic on a hot afternoon and check for excessive heat buildup or stagnant air near the ridge. Soffit vents blocked by insulation stop airflow entirely, and that trapped heat accumulates and accelerates shingle deterioration from below.
Adding or upgrading ridge and soffit vents during a full replacement is straightforward and adds minimal cost to the overall project. These residential roofing best practices at the ventilation stage protect both your shingles and your energy bills over the long run.
Regular inspection is the maintenance step most homeowners skip until something goes wrong. Following residential roofing best practices means building a routine around storm events and seasonal changes, not waiting for a ceiling stain to reveal a problem that's been developing for months.
Post-storm and seasonal inspections catch small issues before they turn into structural damage. A lifted tab, cracked pipe boot, or clogged valley can become a major water intrusion after one more heavy rain if left unaddressed.
Catching damage within 30 days of a storm is often the difference between a covered insurance claim and a denied one.
Documented inspections also protect you during the claims process, because photo evidence tied to a specific storm date gives your adjuster a clear timeline to work from.
Central Texas sees hail events, severe thunderstorms, and ice storms throughout the year. After any storm where hail or wind was reported in your area, schedule a professional inspection before your insurance claim window closes.
From the ground and inside your attic, look for these signs after any significant weather event:
A professional post-storm inspection from a reputable contractor costs nothing upfront in most cases. Scheduling one twice a year keeps your roof in documented, insurable condition year-round.

These eight residential roofing best practices cover every layer of your roof system, from the decking up through the shingles and into your attic. Applying them consistently is what separates a roof that holds up for 30 years from one that starts failing in 10. Every homeowner in Central Texas deserves to know exactly what condition their roof is in, and exactly what it will take to protect their home.
Your roof doesn't have to be a mystery. At Defend Roofing, we document every assessment with 100+ photos and give you a straight answer on whether repair or replacement makes sense for your situation. There's no pressure, no upselling, just clear information so you can make a confident decision. If you're ready to know what your roof actually needs, schedule your free Precision Roof Assessment and we'll get on the roof and show you exactly what we find.