Learn how to handle a roof inspection for insurance claim. Get the steps for documenting damage with photos and proof to ensure your claim is paid fairly.

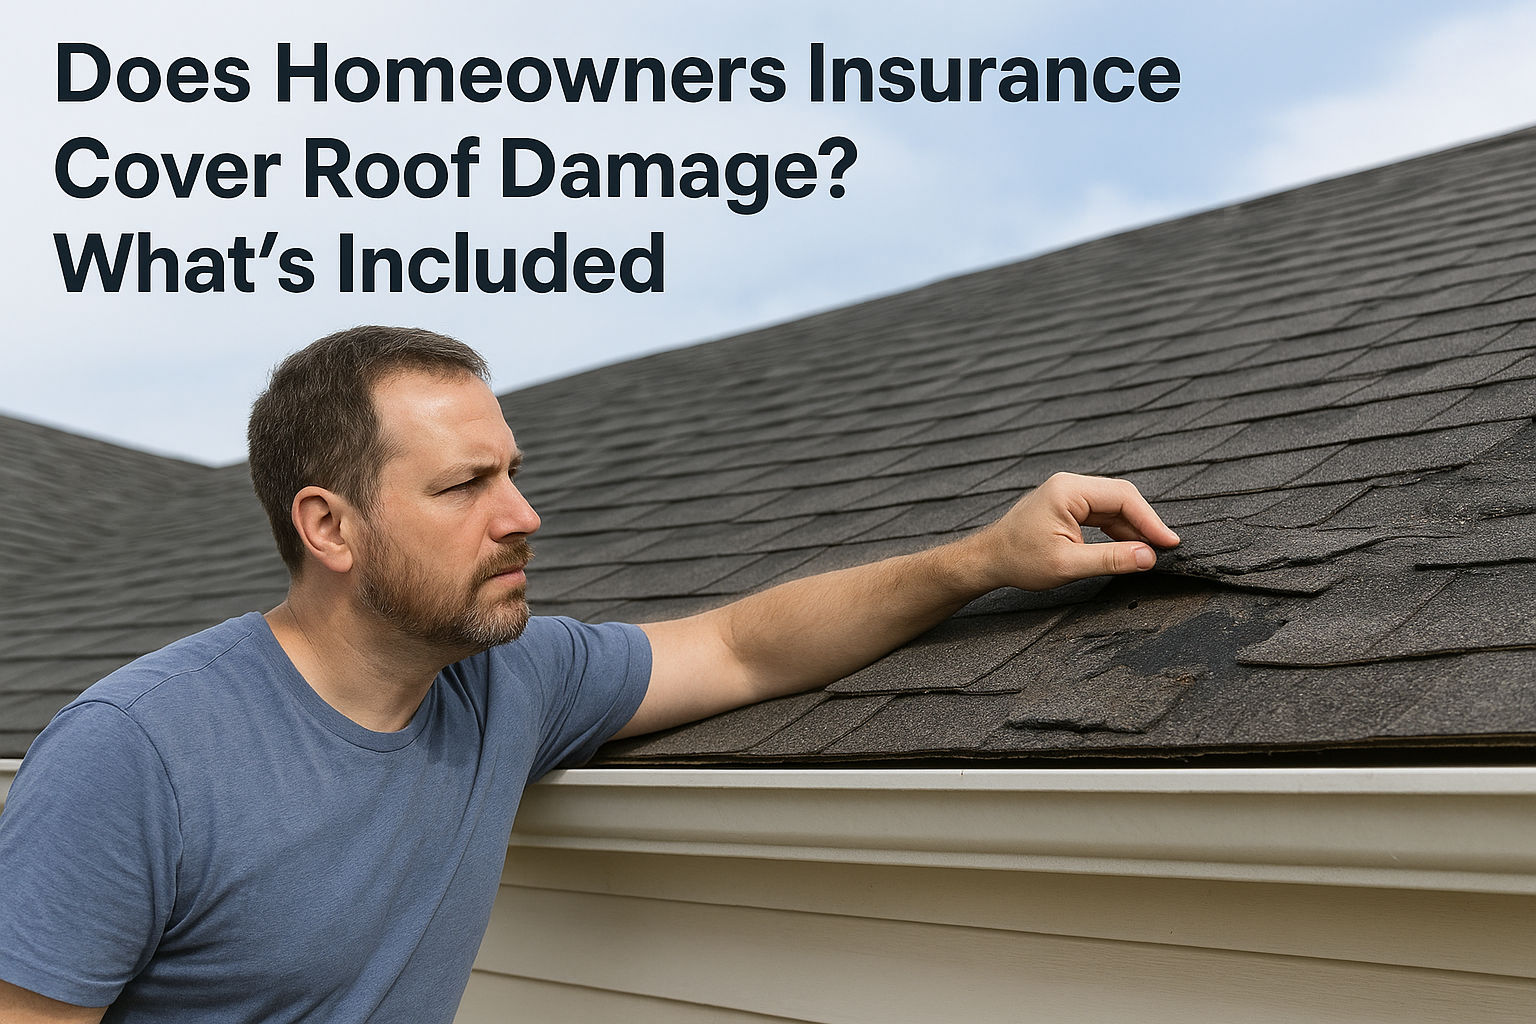
Your insurance company just told you they need a professional inspection before they'll process your claim. Now you're wondering what that actually involves, and whether your roof damage will even qualify. A roof inspection for insurance claim purposes isn't the same as a routine checkup. It requires specific documentation, detailed photo evidence, and a clear understanding of what adjusters need to see before they approve coverage.
Here's the problem most Central Texas homeowners run into: they file a claim, schedule an adjuster visit, and hope for the best, without realizing that the quality of your documentation often determines whether your claim gets approved or denied. Missing photos, vague damage descriptions, and poor timing can cost you thousands in repairs you should have been covered for. That's money you shouldn't have to eat because the process wasn't handled right from the start.
At Defend Roofing, we've walked hundreds of Austin-area homeowners through this exact process. Our 100+ photo Precision Roof Assessment was built specifically to give adjusters the evidence they need, clear, organized, and thorough. Chris and Greyson Buster, our father-and-son team, have seen firsthand how proper inspection documentation changes the outcome of a claim. This guide breaks down each step of the roof inspection process for insurance claims, from scheduling your inspection and documenting damage to working with your adjuster and closing out your claim successfully.
When you file a claim, your insurance company doesn't take your word for it. They need documented evidence that the damage exists, that a covered event caused it, and that it falls within your policy period. A roof inspection for insurance claim purposes serves as that evidence. It connects the storm that hit your neighborhood to the specific damage on your roof, building a factual record your adjuster uses to process your claim. Without it, you're asking the insurer to act on good faith, and that rarely works in your favor.
Most homeowners wait until after an adjuster visit to call a roofing contractor. By that point, temporary repairs may have already been made, debris may have been cleared, and the original damage condition is harder to verify. If you document everything before anyone touches the roof, you lock in the evidence that captures the damage at its most defensible state. That record becomes your baseline for the entire claim.
Your inspection report should include timestamped photos of every damaged area, written descriptions of each defect, and clear notes about what caused the damage. Without that level of detail, an adjuster can argue the damage is pre-existing, unrelated to the storm, or too minor to warrant replacement. With it, you back your claim with facts rather than conversation.
A thorough inspection report gives you proof your adjuster has to respond to, not just a story they can dismiss.
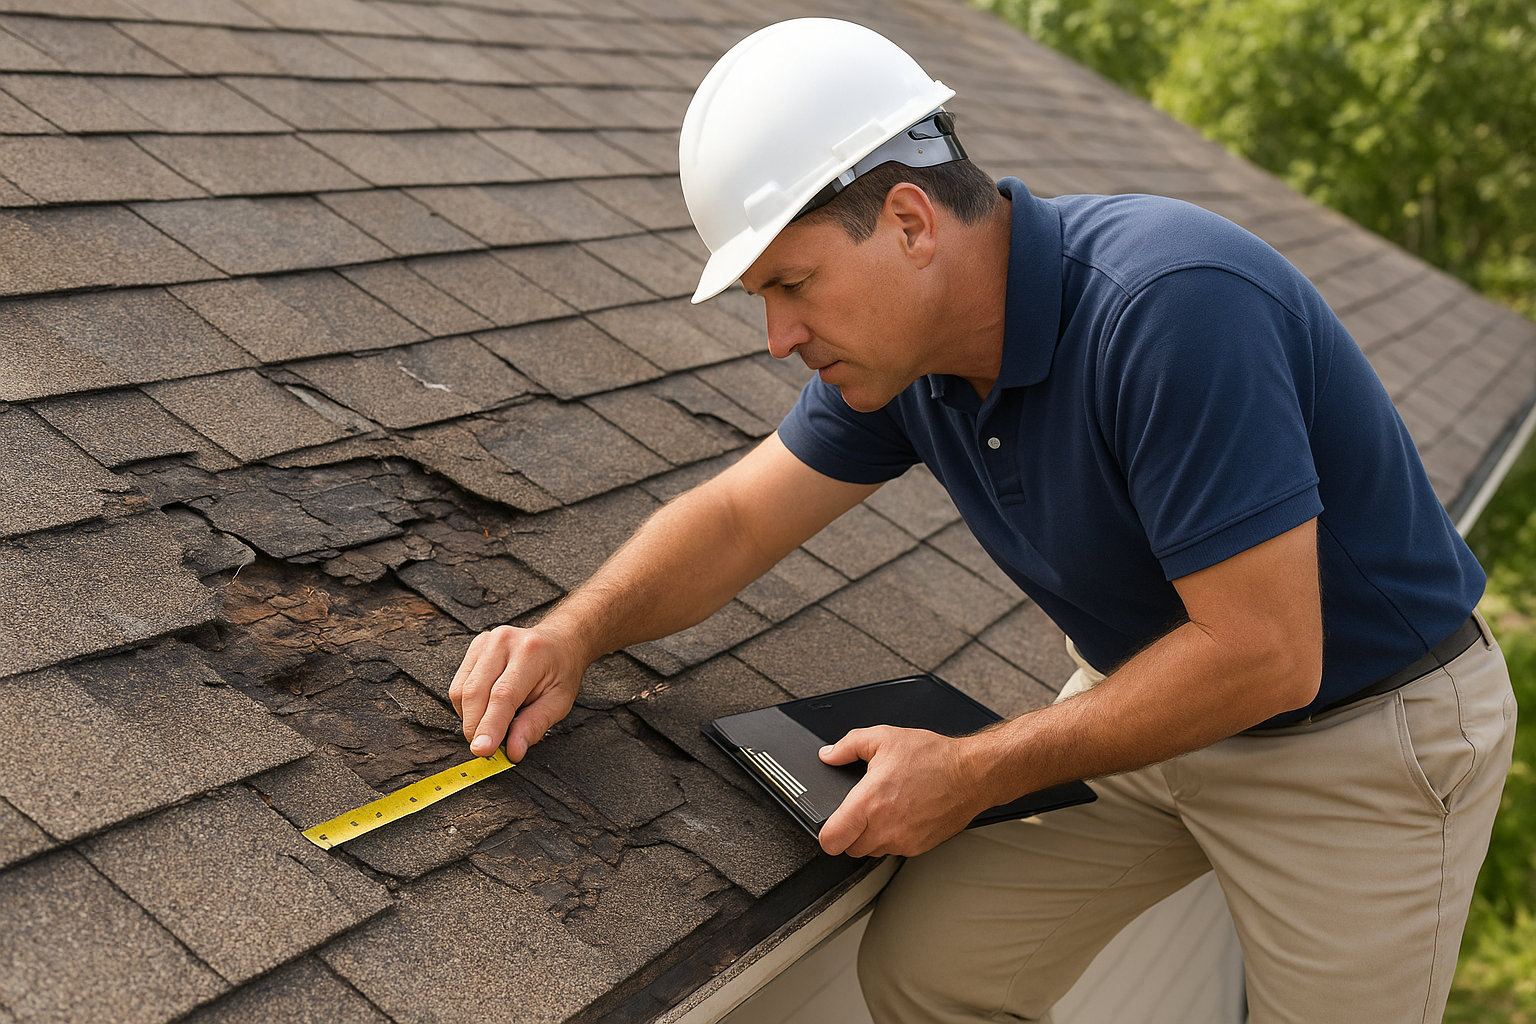
A qualified roofing contractor inspects far more than shingles. Every part of the roof system can sustain damage in a storm, and each damaged component needs to be noted and photographed to build a complete claim. Missing one area, like soffit damage or a compromised ridge cap, can lead to a partial payout or a denied supplement later.
Here's what a complete inspection should cover:
Insurance disputes often come down to who has better documentation. If your adjuster writes a scope that misses half the damage, your inspection report is the tool you use to push back. It gives your contractor, public adjuster, or attorney a factual basis for a supplement request or appraisal demand. Without it, you're arguing from memory against a professional whose job is to minimize the payout.
A strong inspection report also establishes the cause of loss clearly, which matters more than most homeowners realize. Insurers can deny claims by arguing that damage resulted from wear and tear rather than storm impact. Hail hits leave specific bruising patterns, granule loss follows predictable paths, and a trained inspector knows how to document those patterns in a way that directly counters a wear-and-tear denial.
Before you schedule a roof inspection for insurance claim purposes, pull out your homeowner's insurance policy and read it. Most homeowners skip this step, but your policy language controls everything: what damage is covered, how long you have to file, and what documentation your insurer requires. Skipping it up front can invalidate a legitimate claim before it even gets reviewed.
Your policy includes specific language about covered perils and exclusions. Look for sections labeled "Dwelling Coverage" or "Coverage A" and find the list of covered events. Hail and wind are typically listed as named perils, but some older policies exclude certain types of storm damage or have separate provisions for specific materials like tile or metal. You also want to note whether your policy pays Actual Cash Value (ACV) or Replacement Cost Value (RCV), because ACV factors in depreciation and pays significantly less than what full replacement actually costs.
Here are the key items to locate before you file:
Missing your proof of loss deadline can result in a denial even when the damage itself is clearly covered under your policy.
Texas law gives homeowners certain protections under the Texas Insurance Code, but your policy may set shorter internal deadlines for when you must notify the insurer and submit supporting documentation. Call your insurance company to confirm the exact deadline tied to your specific loss date before you do anything else. If a hailstorm hit your area several months ago and you are just now noticing damage, you may still be within the filing window, but you need to verify that immediately.
Your contractor's inspection report forms part of that required documentation, so scheduling it early gives you time to gather everything your insurer needs before any deadline closes.
Before you call a contractor or touch anything on your roof, pull out your phone and document every visible sign of damage. This step matters more than most homeowners realize. The moment anyone makes a repair, patches a leak, or clears debris, you lose the original evidence that supports your claim. Adjusters can challenge damage that has already been partially addressed, and your insurer may argue that the full extent of the loss is now impossible to verify. Locking in that original condition on video and in photos protects your claim from the start.
Document the damage before repairs, before cleanup, and before the adjuster visit so your evidence reflects the actual condition of the roof at the time of the loss.
Walk the full perimeter of your home and capture every area where you see visible damage. You do not need to get on the roof yourself. Ground-level photos of gutters, fascia, siding, and window screens can confirm the storm event and support what a professional finds on the roof later. Inside your home, check ceilings, attic spaces, and walls near exterior corners for any water intrusion or staining. Photograph those areas with clear, well-lit shots that show the full scope of the affected surface.

Focus your documentation on these areas:
After you collect your photos and videos, organize them by location and date before you share them with anyone. Name your files clearly (for example: "front-left-gutter-hail-dents.jpg") so an adjuster or contractor can follow your documentation without confusion. Store everything in a cloud folder with automatic timestamps so the file metadata confirms when the images were taken. That timestamp detail can matter if your insurer tries to argue that damage occurred outside your claim window.
Once you've documented the damage yourself, hire a qualified roofing contractor for an independent inspection before the insurance adjuster arrives. This step matters because it gives you your own professional report to compare against whatever your insurer's adjuster produces. An adjuster works for the insurance company; an independent contractor works for you. That difference in perspective shows up directly in the scope of damage they document.
Not every roofing contractor has experience with insurance claims, so ask the right questions before you book. Look for a contractor who documents every finding with photos, provides a written scope of damage, and has a clear process for adjuster coordination. Avoid anyone who offers to waive your deductible or asks you to sign an assignment of benefits before completing the roof inspection for insurance claim review.
Ask these questions before you hire:
An independent inspection report with detailed photos and a written scope gives you documented leverage if the adjuster's findings come in lower than expected.
Your contractor should deliver a complete written report that covers every component of the roof system, not just the shingles. The report needs to include the inspection date, the inspector's name, timestamped photos for each damaged area, a cause-of-loss statement tying the damage to a specific storm event, and a line-item scope of recommended repairs or replacement. A lump sum estimate without itemized components gives your adjuster room to reduce the payout without explanation.
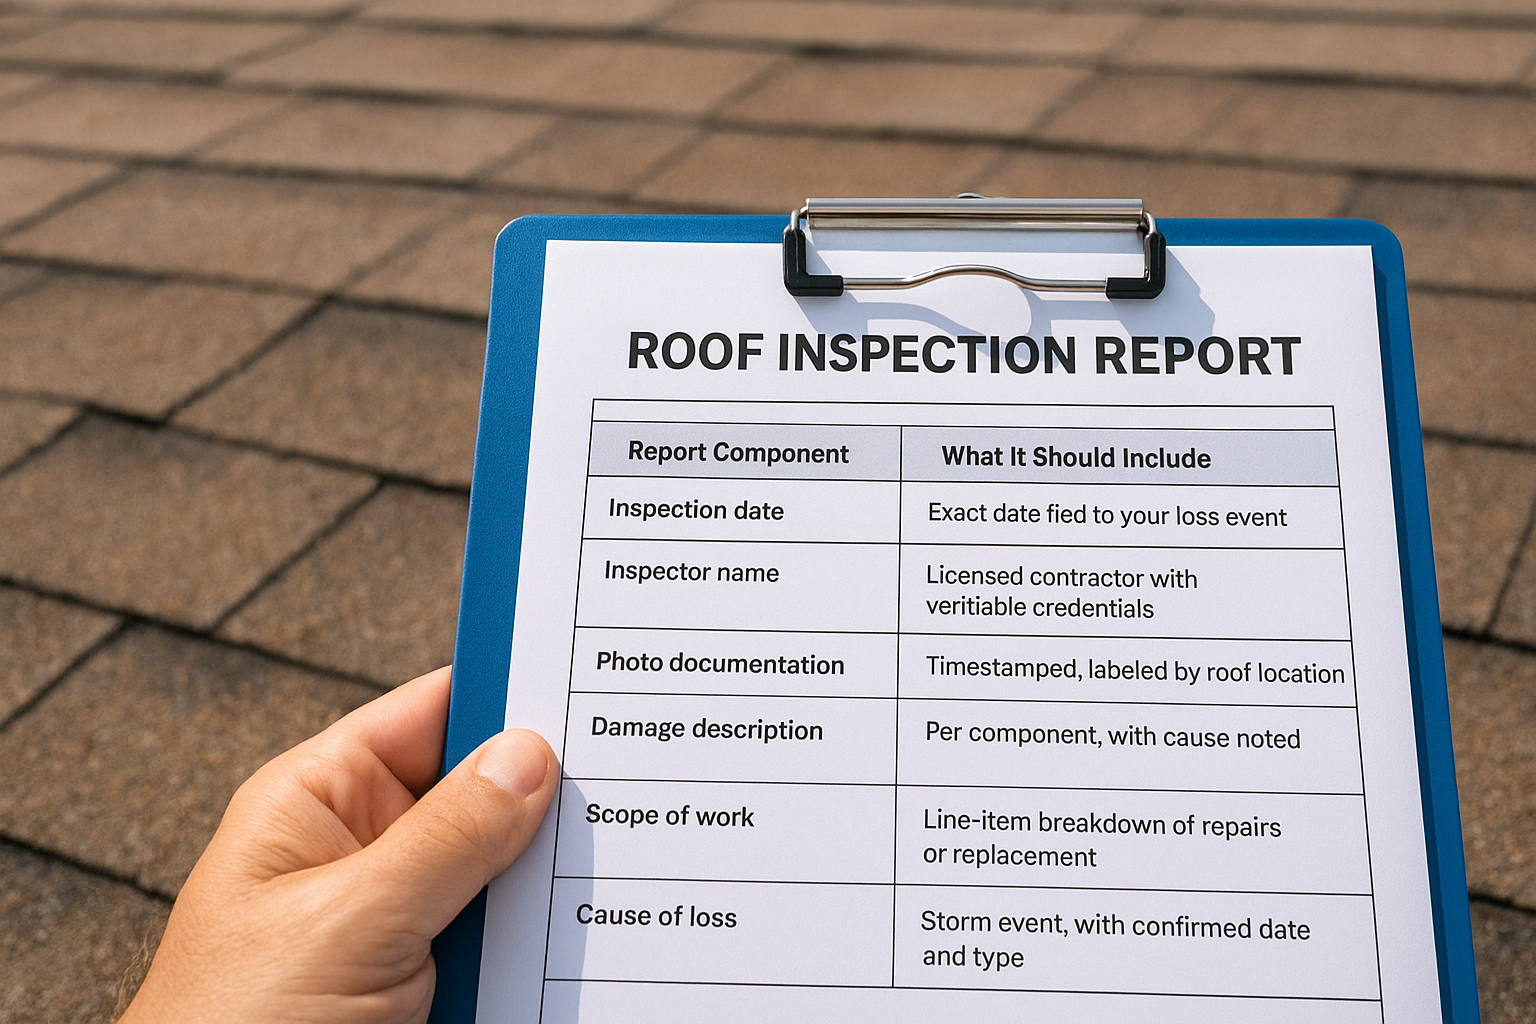
Here is a template of what a complete inspection report should cover:
| Report Component | What It Should Include |
|---|---|
| Inspection date | Exact date tied to your loss event |
| Inspector name | Licensed contractor with verifiable credentials |
| Photo documentation | Timestamped, labeled by roof location |
| Damage description | Per component, with cause noted |
| Scope of work | Line-item breakdown of repairs or replacement |
| Cause of loss | Storm event with confirmed date and type |
Your adjuster visit is not a casual conversation. The adjuster represents your insurance company, and everything you say during that visit can be used to shape the scope and payout of your claim. Before anyone sets foot on your property, understand that your role is to present evidence, not to estimate or speculate about the damage. Let your inspection report and photos do the talking.
Schedule your independent contractor to be present at the same time as the adjuster visit. Having your roofing contractor on-site during the inspection means you have a qualified professional to walk the roof alongside the adjuster, point out each documented damage item, and make sure nothing gets overlooked. Adjusters move quickly, and having someone who completed your roof inspection for insurance claim documentation on-site ensures all findings get reviewed.
Prepare these items before the adjuster arrives:
Bring your contractor on-site during the adjuster visit so there is a second set of qualified eyes on every finding.
Keep your answers factual and brief. When the adjuster asks what you noticed, point to your photos and your contractor's written report rather than offering estimates or opinions. Saying something like "I think the roof is about ten years old" gives the adjuster a reason to calculate depreciation that may not align with your actual policy terms.
Avoid these common mistakes during the visit:
Take written notes throughout the visit. If the adjuster's findings contradict your contractor's report, those notes become critical evidence when you request a re-inspection or file a supplement.
Once you receive the adjuster's written findings, place them side by side with your contractor's independent inspection report. Do not accept the adjuster's scope as final before you run this comparison. The gap between what your contractor documented during the roof inspection for insurance claim and what the adjuster approved is where most homeowners leave money behind without realizing it.
Your adjuster produces a document called an Xactimate estimate or a similar line-item scope sheet. It lists every covered repair item and the dollar amount the insurer plans to pay for each one. Review this document line by line against your contractor's scope of work. Look specifically for components your contractor documented that do not appear in the adjuster's report at all, and note any line items where the adjuster listed a lower quantity or unit count than your contractor's measurements support.
If your contractor documented 24 squares of shingles and the adjuster's report lists 18, that discrepancy needs a written explanation before you accept any payment.
Certain items get missed or undervalued in adjuster reports more frequently than others. Knowing these common gaps helps you catch them before you sign off on a settlement.
| Commonly Missed Item | Why It Gets Skipped |
|---|---|
| Starter strip and ridge cap | Treated as included when they need separate line items |
| Drip edge replacement | Often omitted unless specifically documented with photos |
| Decking repairs | Not visible without physical inspection of soft spots |
| Flashings at penetrations | Missed when only shingles are visually inspected |
| Gutters and downspouts | Documented separately from the roof system |
Write a clear, itemized list of every discrepancy you find, referencing the specific line item from the adjuster's report and the corresponding photo and measurement from your contractor's report. Share this list with your roofing contractor so they can prepare a formal supplement request backed by the documentation you already collected. Keep your tone factual throughout; you are presenting evidence, not arguing. Submit the supplement request in writing to your adjuster with your contractor's photos, measurements, and written scope attached so the insurer has a complete record to review.
After you compare reports and identify gaps, you have three possible paths depending on what you find: a supplement request, a formal dispute of a denial, or an appraisal demand. Each path requires specific written documentation and a clear understanding of your rights under Texas insurance law. Your contractor's independent report from the roof inspection for insurance claim is the foundation for all three.
A supplement request is the right move when the adjuster approved the claim but missed line items or underpaid specific components. Your contractor submits a written request that lists each disputed item with the corresponding photo evidence, measurements, and the adjuster's original scope as a reference. Keep all communication in writing so you have a documented record if the insurer disputes the supplement later.
File a supplement when you find:
If your claim gets denied, read the denial letter word by word. The denial reason is your direct roadmap for the response. Common denial reasons include a finding that damage predates your policy, a determination that wear and tear caused the damage rather than a storm, or a missed filing deadline. If your inspection report documents storm-specific damage patterns such as hail bruising or directional granule loss, that evidence directly counters a wear-and-tear denial.
A denial is not a final answer if your documentation shows the insurer's stated reason does not match the physical evidence on your roof.
Submit a written dispute letter that references each specific finding in your contractor's report, attaches your timestamped photos, and cites the exact denial reason you are challenging. Send it via certified mail so you have proof of receipt.
Texas homeowners have the right to invoke the appraisal process when you and your insurer cannot agree on the amount of loss. Each side selects an independent appraiser, and those two appraisers choose a neutral umpire. The umpire's decision on disputed amounts is binding. Invoke this process in writing and confirm your policy includes the standard appraisal clause before you proceed.

You now have a complete picture of how the roof inspection for insurance claim process works, from reading your policy and locking in your documentation to handling supplements and appraisal demands. Each step builds on the one before it, and the quality of your evidence at every stage determines how much of your claim the insurer has to pay. Skip a step or document poorly, and you give the adjuster room to reduce or deny what you are rightfully owed.
Your next move is to get a professional inspection from a contractor who knows how to document damage in a format adjusters actually respond to. Defend Roofing's Precision Roof Assessment includes 100+ timestamped photos, a written scope, and adjuster coordination so you walk into your claim with everything documented and organized. Schedule your free roof inspection in Austin and get the evidence your claim needs before your filing deadline closes.