Learn how to identify hail damage on roof with 12 clear signs. Spot shingle bruising and gutter dents to collect the evidence you need for insurance.
A hailstorm rolls through Central Texas, and twenty minutes later you're standing in your yard wondering if your roof took a hit. Knowing how to identify hail damage on roof surfaces matters because the signs aren't always obvious from the ground, and waiting too long can turn a covered insurance claim into an out-of-pocket expense.
At Defend Roofing, our father-and-son team (Chris and Greyson Buster) has assessed thousands of roofs across the Austin area after storms. We've seen everything from softball-sized impact craters to damage so subtle that homeowners, and even some adjusters, miss it entirely on first inspection. That hands-on experience is exactly why we document every assessment with 100+ photos before making any recommendation.
This guide breaks down 12 specific signs of hail damage across different roofing materials, so you can inspect your own roof with confidence, understand what you're looking at, and decide whether it's time to call a professional. We'll cover what real damage looks like versus normal wear, which areas to check first, and how your findings connect to the insurance claim process.
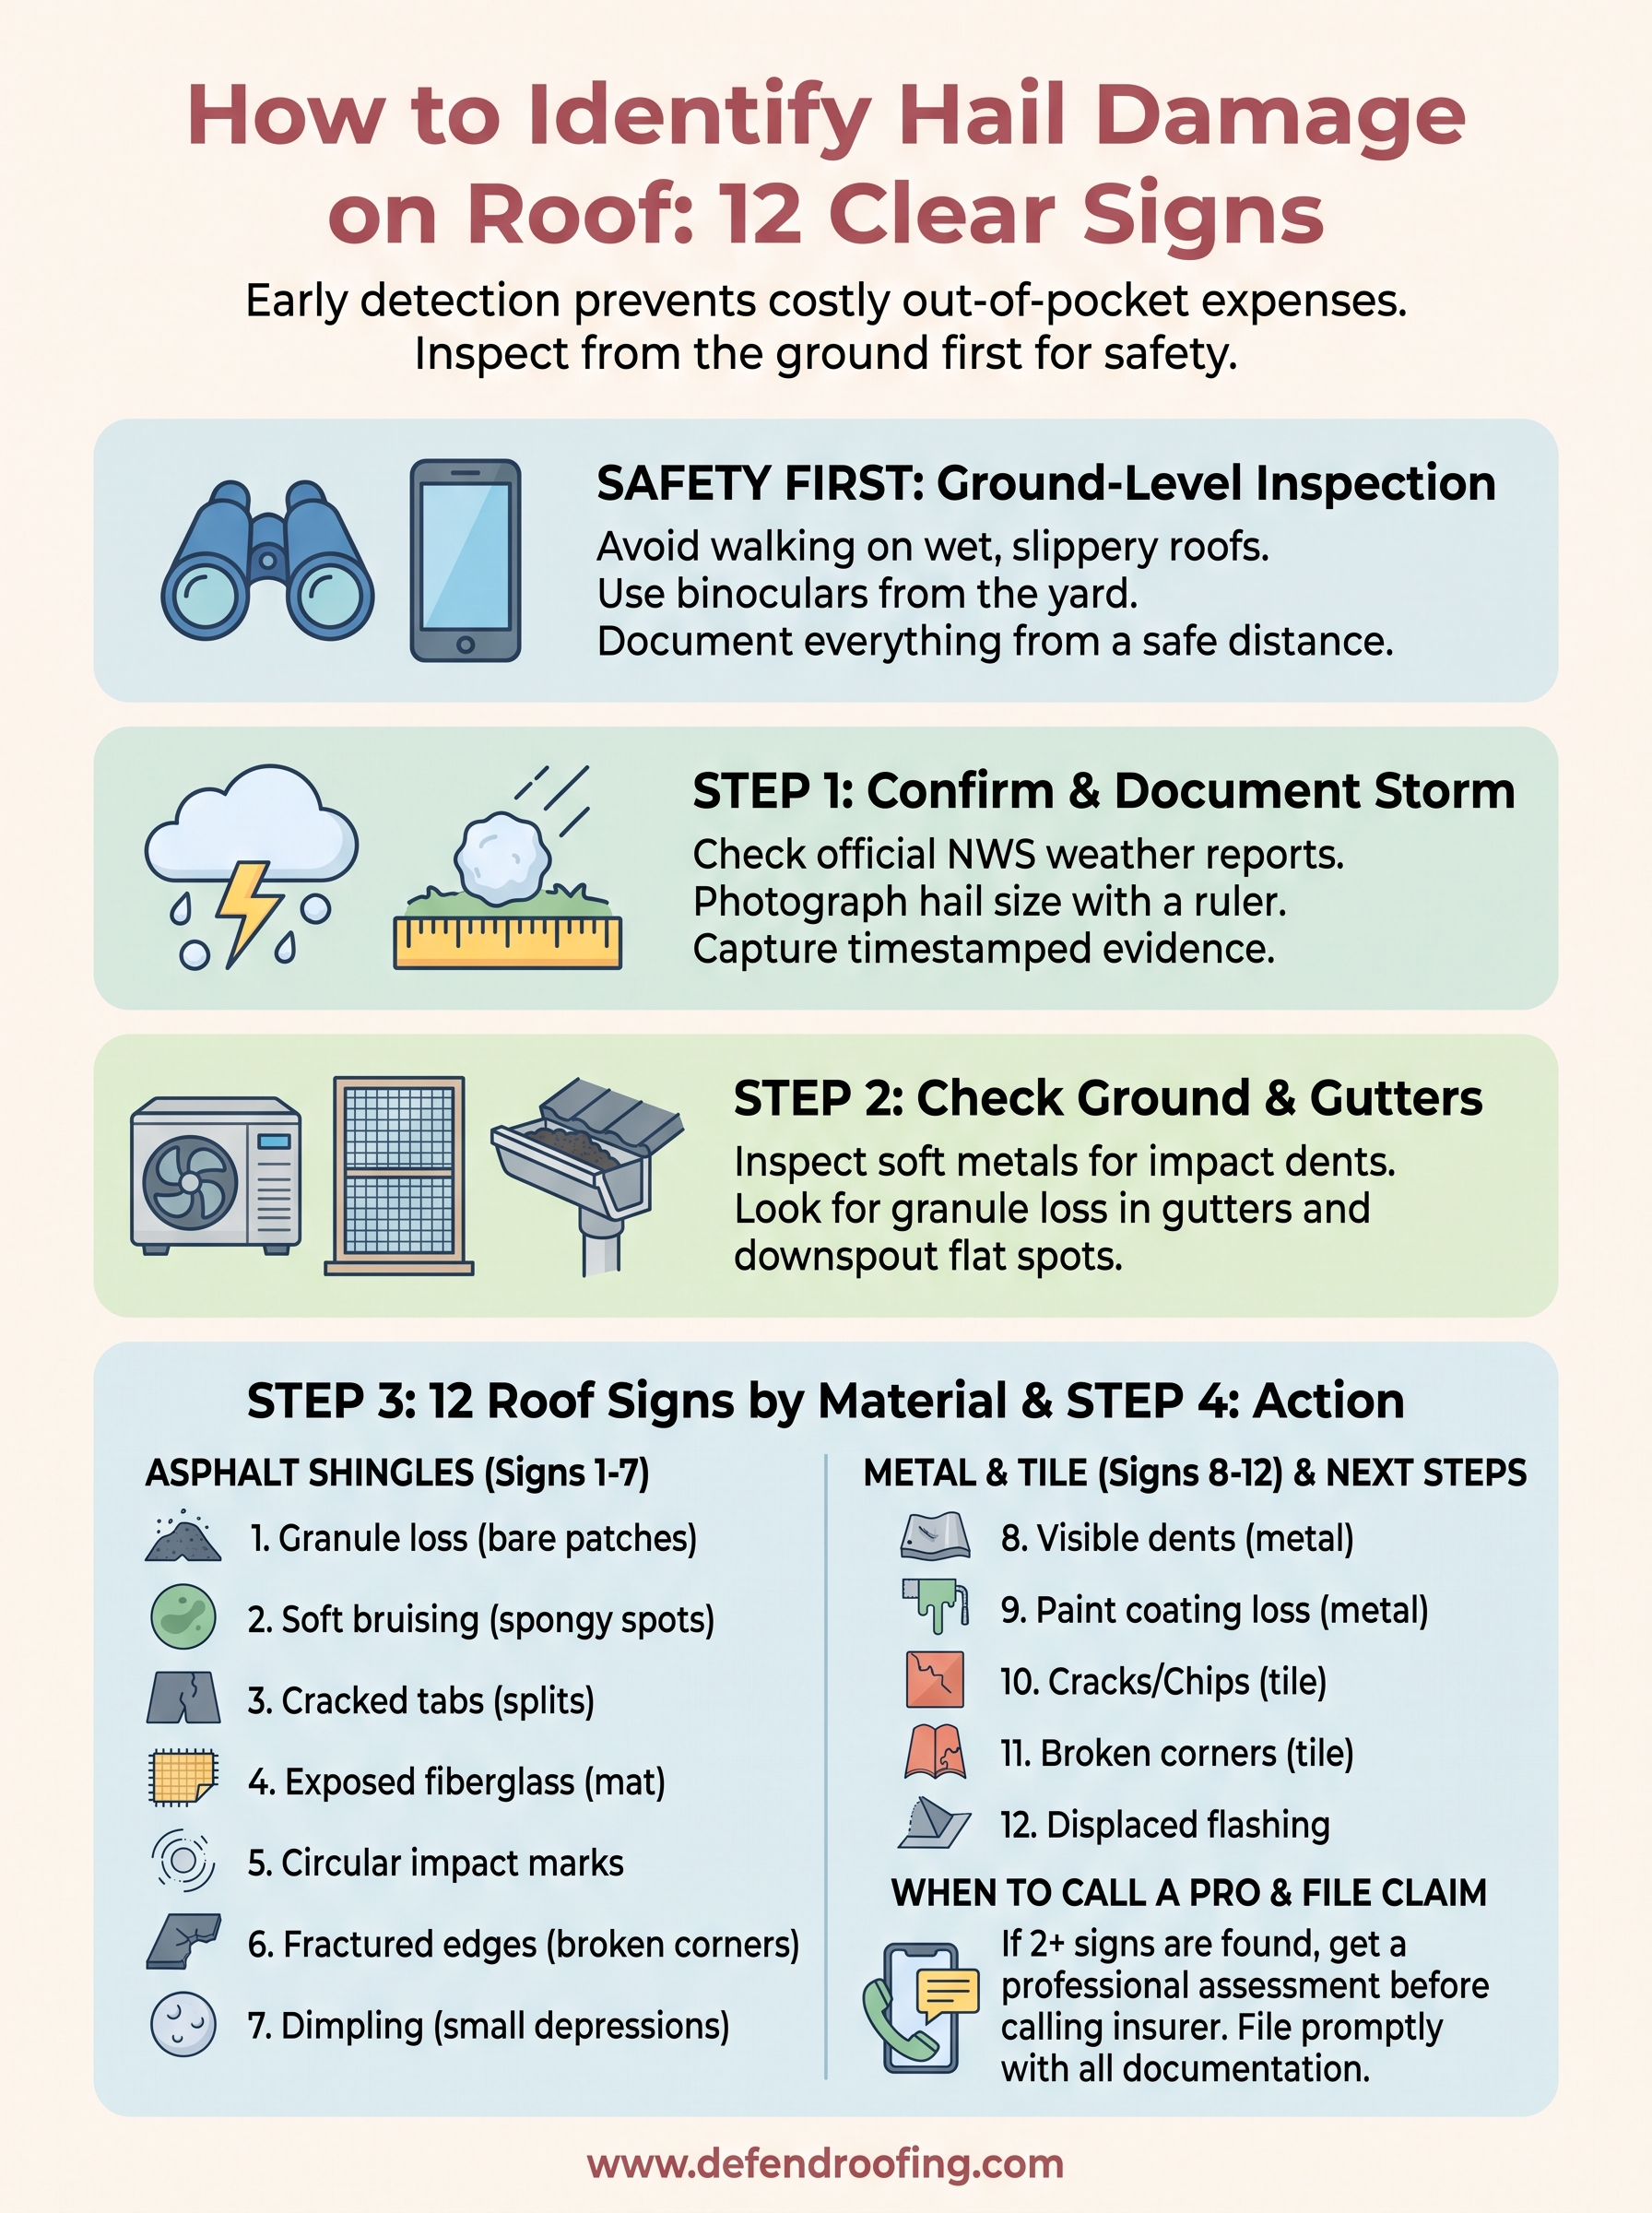
Before you focus on how to identify hail damage on roof surfaces, you need to address your personal safety. Wet shingles after a storm are extremely slippery, and a roof that just took a hit from hail may have soft spots or cracked decking you cannot detect until you are already standing on them. A thorough ground-level inspection catches the majority of significant damage without you ever stepping onto the roof, so start there.
Your best inspection position is standing in your yard with binoculars, not on a ladder propped against the fascia. Walk the full perimeter of your home and scan ridges, valleys, and the field areas of each slope from multiple angles. If you do go up a ladder to check gutters, keep both hands on the rungs and only inspect what you can see without climbing onto the roof surface itself.
Never walk a storm-damaged roof without professional training and proper fall protection equipment in place.
Gathering the right tools before you start makes your inspection more thorough and your documentation more useful when you present findings to an insurance adjuster. A short checklist keeps you from missing anything:
Having this gear ready before you walk outside saves time and produces better records for your claim.
Before you focus on how to identify hail damage on roof surfaces, confirm that hail actually fell at your specific address. Insurance claims require a dated weather event tied to your location, and missing that documentation can delay or void your payout even when real damage exists.
Pull your storm report from the National Weather Service at weather.gov by entering your zip code and reviewing recent severe weather events. Write down the date, time, and reported hail size for your area. Hail at or above 1 inch in diameter typically causes functional damage to asphalt shingles, metal panels, and gutters, so hail size matters when you present your claim.
Save a screenshot of the weather report to your phone the same day the storm hits, because historical data becomes harder to retrieve as weeks pass.
Take a short video of any hail still on the ground, placing a ruler next to the largest piece you find. Also photograph visible dents on soft metals near your home, such as your mailbox, AC condenser fins, or window screens. These items dent at roughly the same hail size that damages your roof, and they give your insurance adjuster a clear, timestamped record of what fell before you start your inspection.
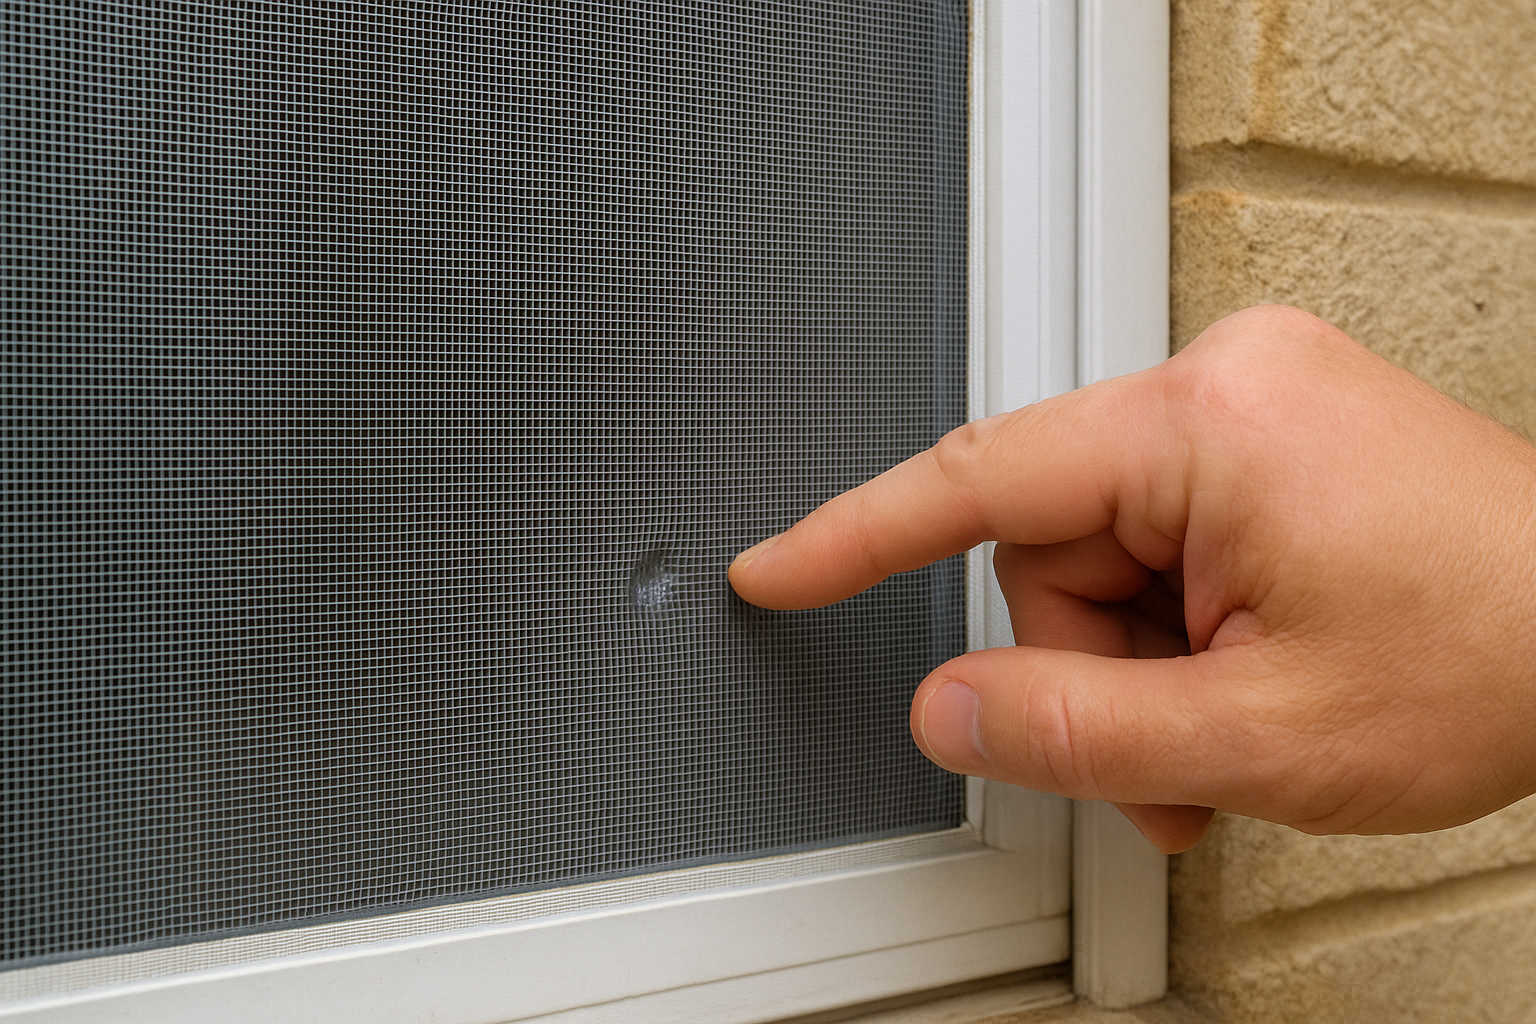
Your yard and exterior surfaces give you a reliable preview of roof damage before you look at a single shingle. Soft metals around your home dent at the same hail size that bruises shingles, so they act as a quick damage indicator you can check in minutes.
Walk to your AC condenser, window screens, and metal fascia and look for fresh circular dents with clean edges. New hail impacts show a bright, shiny center where the metal compressed, unlike older dings that carry rust around the rim. Check these key surfaces:
Gutters are one of the best spots to learn how to identify hail damage on roof systems because they collect granules knocked loose from shingles on impact. Scoop out debris and look for dark, sand-like granules mixed in with the leaves and dirt.
Heavy granule deposits in gutters after a storm signal accelerated shingle wear and strengthen your claim documentation.
A clogged or dented downspout is another clear sign. Hail large enough to damage shingles will leave visible flat spots along aluminum downspout seams, giving your adjuster physical evidence at eye level.
Different roofing materials show hail damage in distinct ways, so knowing what to look for on your specific roof makes your inspection far more accurate. Use this breakdown to learn how to identify hail damage on roof surfaces based on what covers your home.
Asphalt shingles show the most varied damage patterns. Check for these seven specific signs:
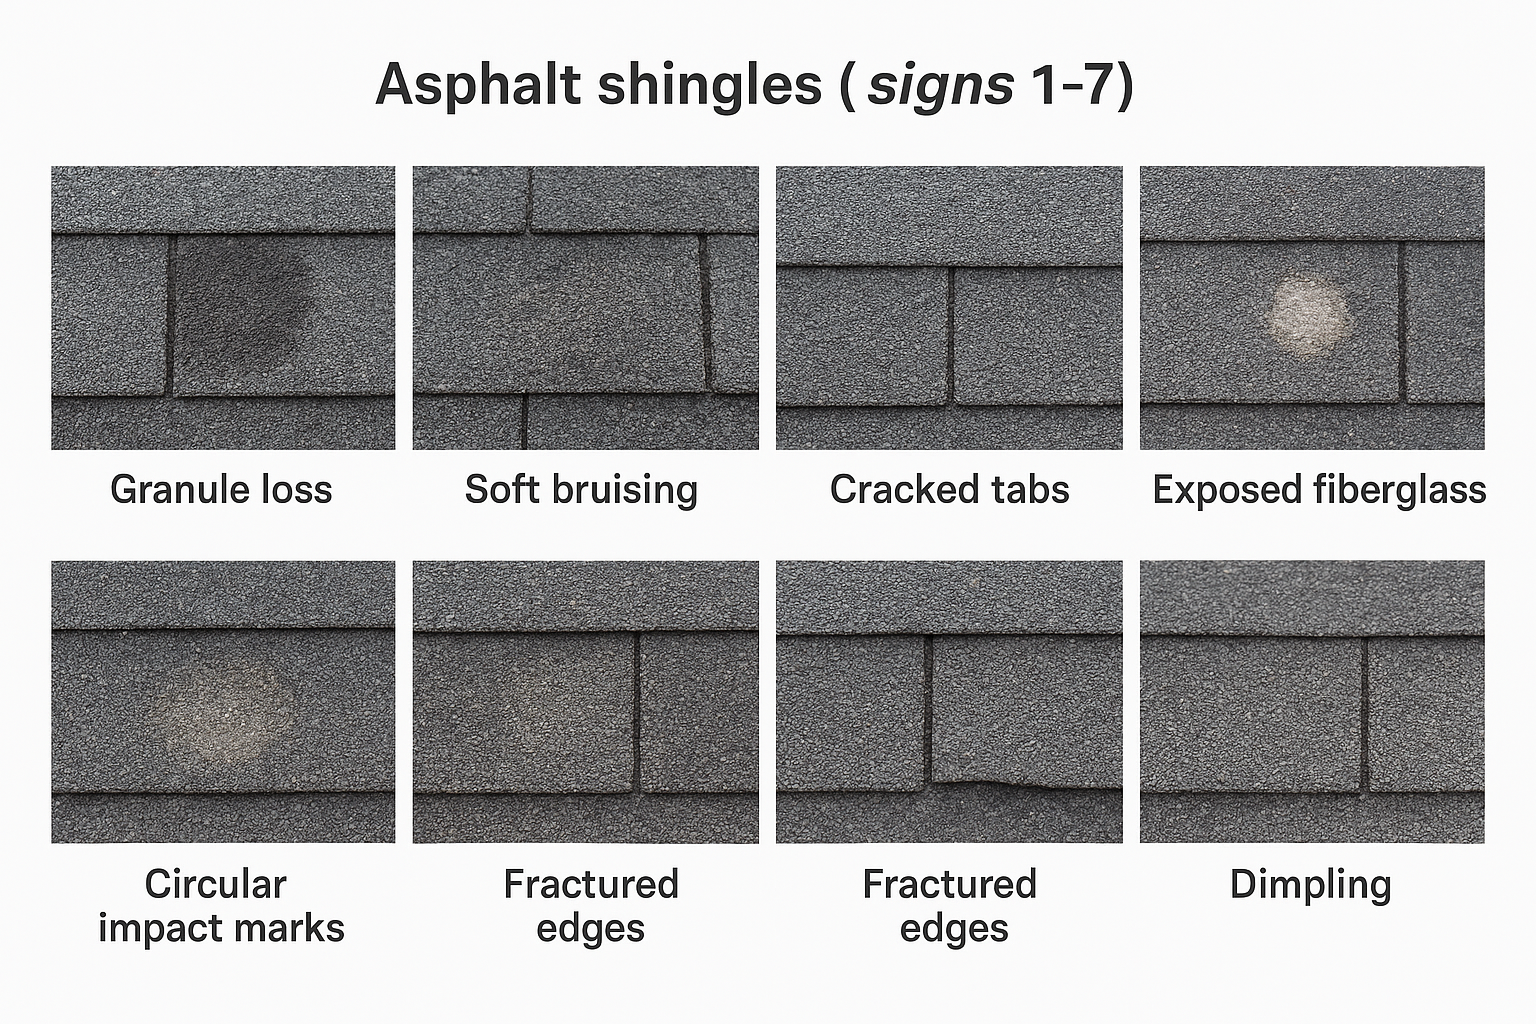
| # | Sign | What it looks like |
|---|---|---|
| 1 | Granule loss | Bare, dark patches exposing mat |
| 2 | Soft bruising | Spongy feel under thumb pressure |
| 3 | Cracked tabs | Clean splits across shingle face |
| 4 | Exposed fiberglass | White or tan mat showing through |
| 5 | Circular impact marks | Round discoloration with missing granules |
| 6 | Fractured edges | Tab corners broken or lifted |
| 7 | Dimpling | Small depressions visible at low sun angles |
Soft bruising is the most commonly missed sign because it looks like a simple dark spot but signals broken mat fibers underneath.
Metal panels dent visibly and lose paint coating at impact points (signs 8-9). Tile roofs crack or chip along impact edges (signs 10-11). All materials can show displaced flashing at ridges and valleys (sign 12).
Once you understand how to identify hail damage on roof surfaces, you need to decide your next move. Finding even two or three of the 12 signs listed above means you should bring in a licensed roofer before contacting your insurer, because a professional written assessment carries more weight with your adjuster than homeowner photos alone.
Certain findings during your walkthrough make a professional inspection non-negotiable. Soft bruising on multiple shingles, cracked tiles, or heavy granule deposits in gutters all indicate functional damage that shortens your roof's lifespan. Call a roofer immediately if you find:
Contact your insurer within the claim window stated in your policy, which in Texas is typically one year from the storm date. Provide your adjuster the storm report from the National Weather Service, your timestamped photos, and your roofer's written assessment. Submitting complete documentation upfront prevents delays and reduces the chance of a disputed settlement.
The sooner you file after confirming damage, the easier it is to connect your claim to the specific storm event.
Now you know how to identify hail damage on roof surfaces, gutters, and exterior metals in a logical sequence. The inspection process works best when you move in order: storm documentation first, ground-level clues second, then roof-surface signs by material type. That sequence gives you a complete, defensible record before you ever speak to an adjuster.
Your next move depends on what you found. If you spotted two or more of the 12 signs, bring in a licensed roofer before calling your insurer. A professional written assessment paired with your own timestamped photos gives your claim the strongest possible foundation. At Defend Roofing, Chris and Greyson Buster provide every homeowner with 100+ photos and an honest repair-versus-replace recommendation with no pressure to buy anything you don't need.
Ready to get eyes on your roof? Schedule a free roof assessment and we'll document everything for you.