Fix leaks and prevent water damage. Learn how to repair a flat roof by identifying membrane types, applying permanent patches, and performing maintenance.
A flat roof leak doesn't wait for a convenient time. You notice a water stain on the ceiling, a soft spot in the decking, or pooling water that won't drain, and suddenly you're searching how to repair a flat roof before the damage spreads. The good news is that many flat roof issues are fixable without tearing everything off and starting over. The key is knowing what you're dealing with before you grab a bucket of sealant and climb up there.
Flat roofs fail differently than pitched roofs. Their low slope makes them prone to standing water, membrane splits, and flashing failures, problems that can look minor from the ground but cause serious interior damage if ignored. Whether your flat roof is built-up, modified bitumen, TPO, or EPDM, each material has its own repair approach. Understanding the difference matters because the wrong fix can make things worse.
At Defend Roofing, we've repaired and replaced flat roofs across Central Texas, and we've seen what happens when small leaks get patched incorrectly or left too long. This guide walks you through identifying the source of your flat roof leak, choosing the right materials, and making repairs that actually hold. We'll also cover when a DIY patch makes sense and when it's time to call in a professional, because not every flat roof problem belongs on a weekend project list.
Before you learn how to repair a flat roof, you need to understand what can go wrong before you even start the repair. A flat roof feels stable until it isn't. Wet roofing material, rotted decking, and surface debris all create slip-and-fall hazards that deserve your full attention before you touch anything else. Taking 10 minutes to prepare properly protects you and makes the actual repair go faster.
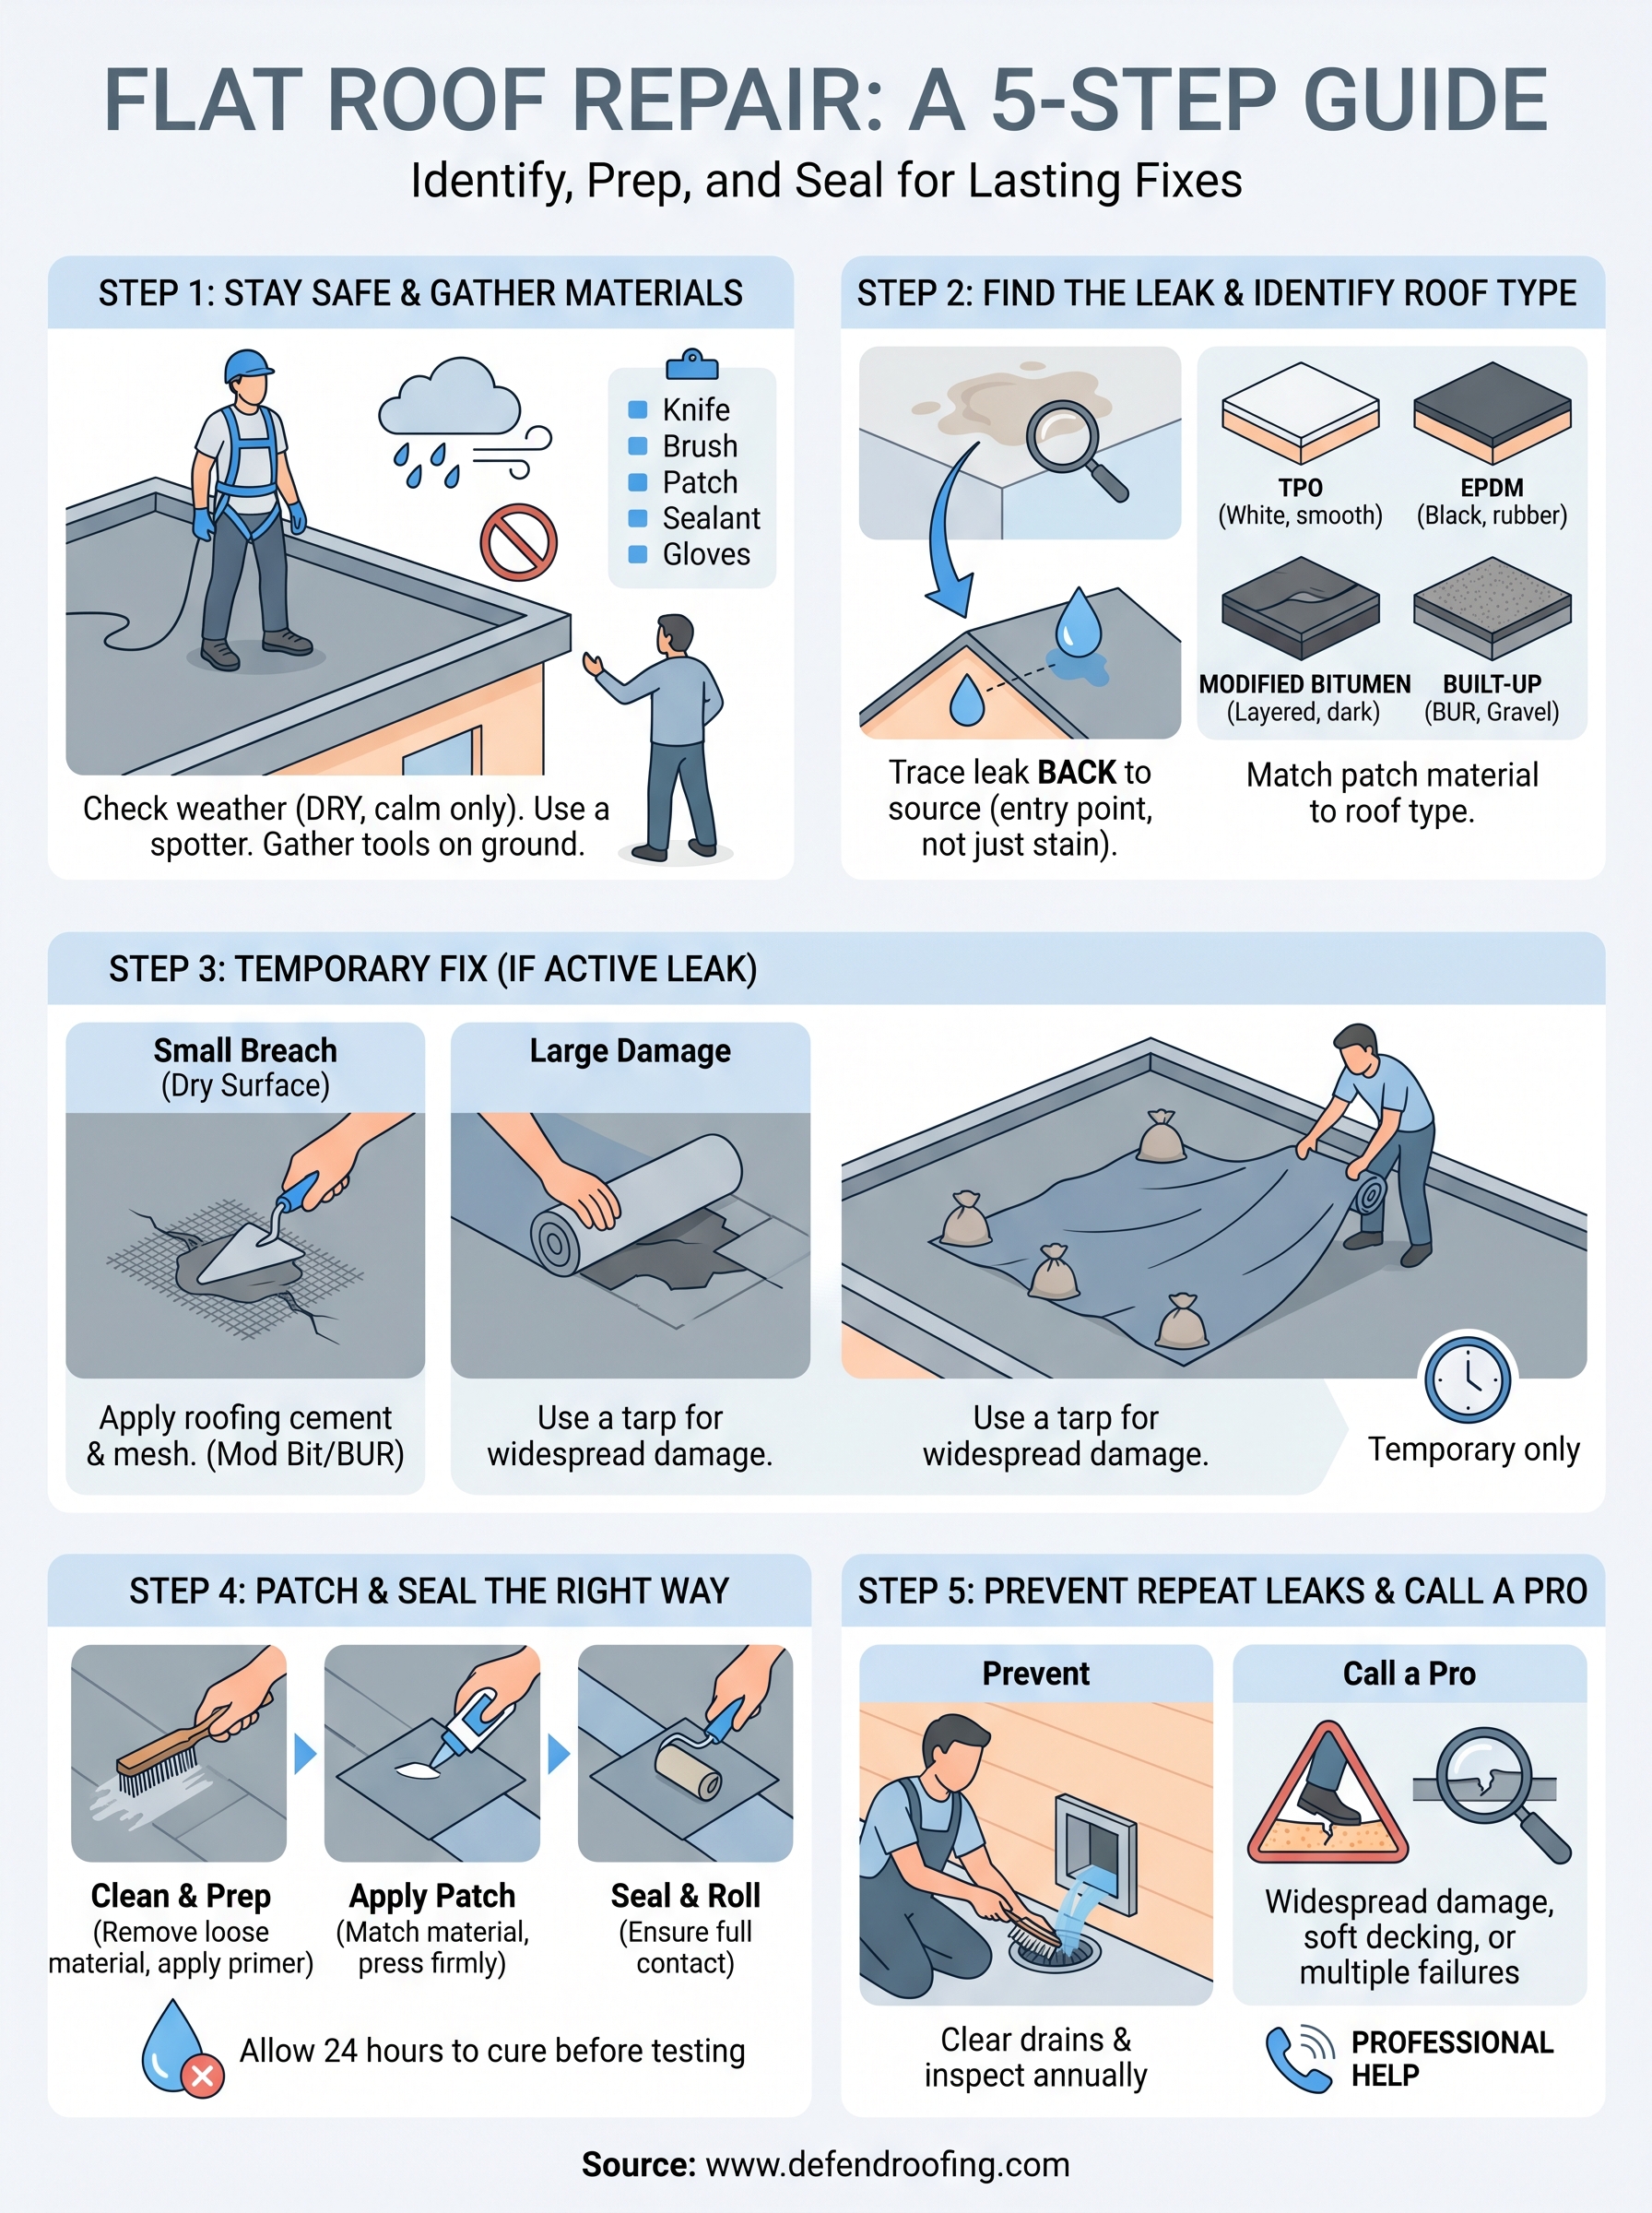
A flat roof sits low compared to a pitched roof, but that doesn't make it low-risk. Falls from flat roofs cause serious injuries every year, and many happen to experienced workers who skipped a basic precaution. Before stepping onto any surface, check the weather forecast. You want dry conditions with no wind, ideally a calm morning when the surface isn't wet or slick from overnight moisture.
Never step onto a flat roof after rain. Even a thin film of water on TPO or EPDM membrane turns the surface into a slip hazard.
Walk the perimeter from the ground first. Look for soft spots, bubbled sections, or areas where the membrane has lifted. If you see large sections of structural damage, or the decking feels soft underfoot when you first step on, stop and call a professional. Your weight can punch through compromised decking.
Wear rubber-soled shoes with good grip, not sandals or hard-soled boots. Bring a spotter if you're working alone, someone who stays on the ground and can call for help if something goes wrong. Keep your phone on you, not in a bag sitting on the ground below.
The biggest time waster in any roof repair is making multiple trips up and down because you forgot something. Gather everything you need on the ground before you go up. Once you're on the roof, you want your full attention on the work. Here's what you'll typically need for a standard flat roof patch:
| Item | Purpose |
|---|---|
| Roofing knife or utility knife | Cutting damaged membrane or felt |
| Wire brush or stiff broom | Cleaning the repair area |
| Roofing membrane patch (matching material) | Primary repair material |
| Roofing cement or lap sealant | Sealing patch edges |
| Primer (for TPO or EPDM repairs) | Ensures proper adhesive bond |
| Hand roller or seam roller | Pressing the patch flat |
| Putty knife or trowel | Applying roofing cement evenly |
| Clean rags and solvent | Surface prep and cleanup |
| Safety glasses and gloves | Personal protection |
Match your patch material to your existing roof type. Using EPDM patch tape on a TPO membrane won't bond correctly and will fail within months. If you don't know your roof type, look for a manufacturer label near the edge or on any existing repair. Step 2 covers how to identify your roof type before you commit to any materials.
Keep your supplies in a bag or bucket you can carry or drag along the roof surface. Never stack heavy materials in one spot, especially near drains or over older sections where the decking may already be weakened. Distribute your weight as you move and stay alert to how the surface feels beneath your feet.
Finding a flat roof leak requires working backward. Water travels from the entry point to wherever it shows up inside, which means the stain on your ceiling is almost never directly below the actual hole. Before you know how to repair a flat roof correctly, you need to find where the water is actually getting in, not just where it's appearing on your ceiling.
Start inside your home. Look at the stain on your ceiling and note its location, then go to the roof directly above it. Water on a flat roof can travel several feet before finding a gap in the decking or membrane, so expand your inspection zone at least three to five feet in every direction from the spot directly above the interior water damage.
Once you're on the roof, look for these common entry points in order:
If you find more than one damaged area, repair all of them at the same time. Fixing only the most obvious spot often just shifts the leak to the next weak point.
Knowing your membrane type determines every product you use in the repair. Applying the wrong adhesive or patch material will fail fast, sometimes within a single rain event. Check near the roof edge or around any existing cuts for a manufacturer label.
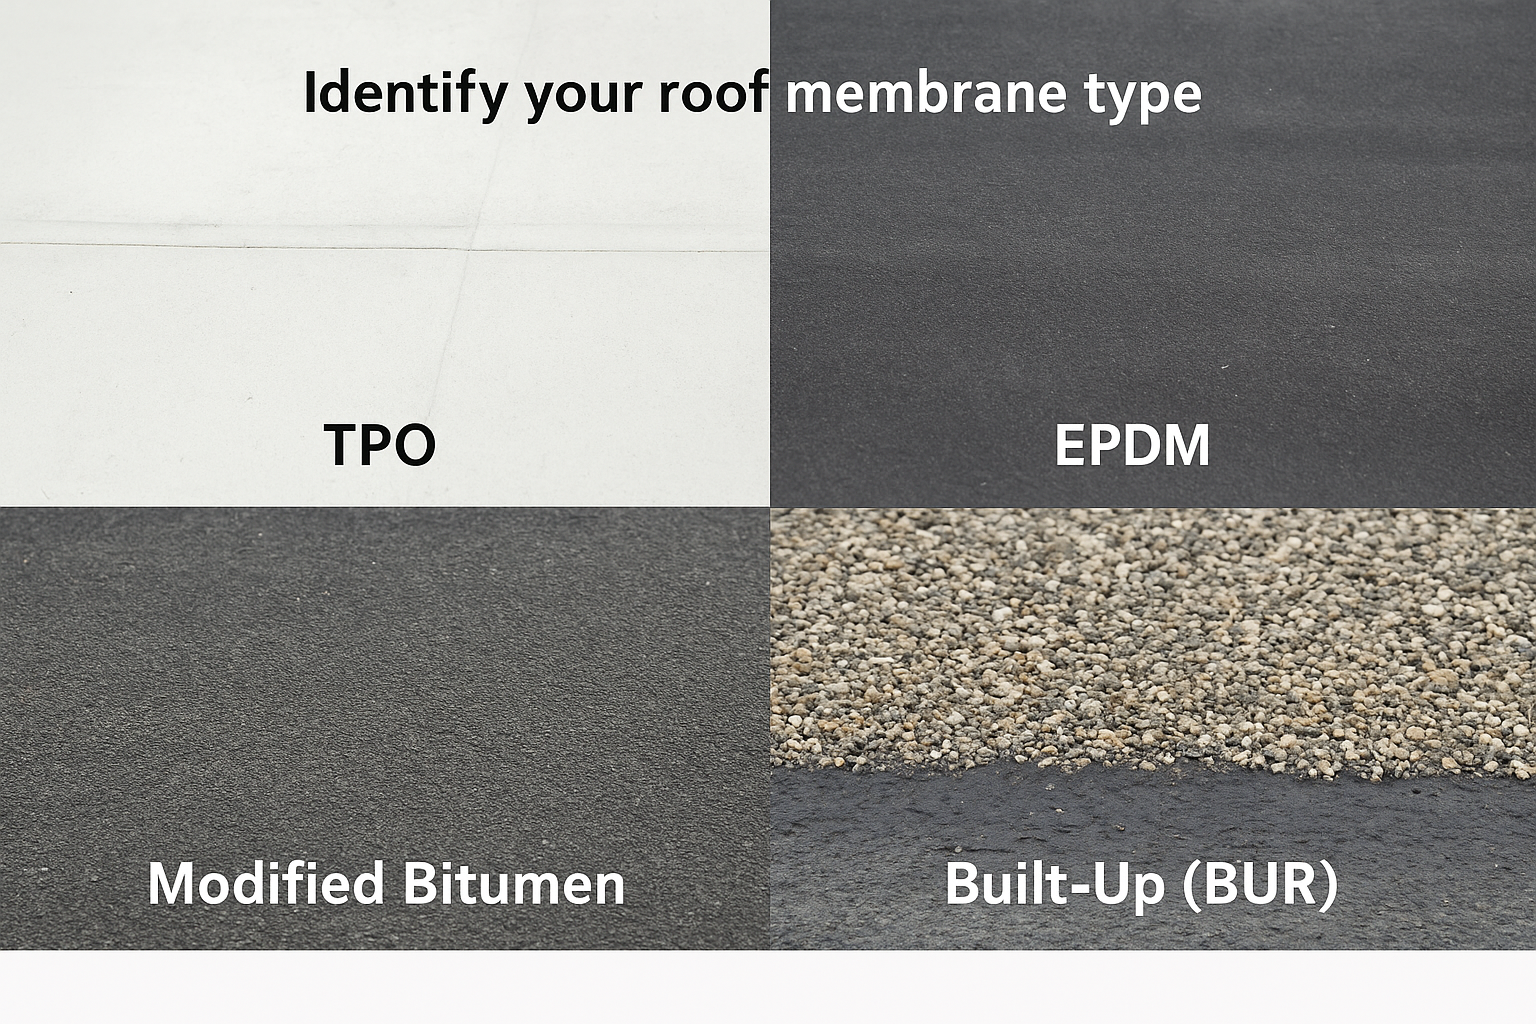
Here's how to identify the four most common flat roof types by sight:
| Roof Type | What It Looks Like |
|---|---|
| TPO | White or light gray, smooth surface with visible seams |
| EPDM | Black or dark gray, rubber-like texture, sometimes with a granule surface |
| Modified Bitumen | Dark, often with a granule or foil surface, layered look |
| Built-Up (BUR) | Multiple layers of felt and asphalt, gravel surface common |
If you still can't identify the material, take a photo and send it to your roofing contractor or check for any previous installation paperwork in your home records. Getting this step right before you buy any materials saves you time and money on the repair.
When water is actively coming through your flat roof, your first goal is containment, not a permanent repair. Trying to do a full patch while the roof is wet or while rain is still falling almost always wastes materials and time. A temporary fix buys you the dry window you need to make a proper repair in Step 4, and it limits how much water reaches your interior in the meantime.
Roofing cement is your fastest option for sealing a small open area when you need to act quickly. It works on modified bitumen and built-up roofs and gives you a watertight seal that holds through one or two rain events while you wait for better conditions. The surface must be as dry as possible before you apply it, so blot or wipe the area clean and give it time to air out first.
Here's how to apply a roofing cement temporary patch:
This temporary patch is not a substitute for the proper repair in Step 4. Treat it as a bridge that gets you through a rain event, nothing more.
If the damaged area spans more than a few square feet, or if you find multiple problem spots during your inspection, a reinforced polyethylene tarp is the most practical short-term solution. Knowing how to repair a flat roof the right way means recognizing when to protect the surface first rather than rushing a fix that won't hold.
Lay the tarp over the entire damaged section and extend it at least two feet past the damage on all sides. Secure the edges with sandbags or weighted lumber so wind can't lift it. Skip nails or screws entirely because they punch new holes straight through the membrane. Check the tarp position after any wind event to make sure it hasn't shifted off the damaged zone.
Once you have dry conditions and a clear picture of your damage, you can make the actual repair. This is the step where knowing how to repair a flat roof correctly pays off. A rushed or poorly prepared patch fails within one season and leaves you back where you started. Give this step the time it deserves.
Surface prep determines whether your patch bonds or peels. Start by cutting away any loose, blistered, or saturated membrane around the damage with a utility knife. You need clean, firm edges for the adhesive to grip. Use a wire brush to scrub the repair zone, then wipe it down with the appropriate solvent for your specific membrane type. Let it dry completely before you apply any adhesive or patch material. Rushing this step is the fastest way to waste time and materials.
Never skip priming on TPO or EPDM surfaces. Skipping primer is the single most common reason DIY patches fail within weeks.
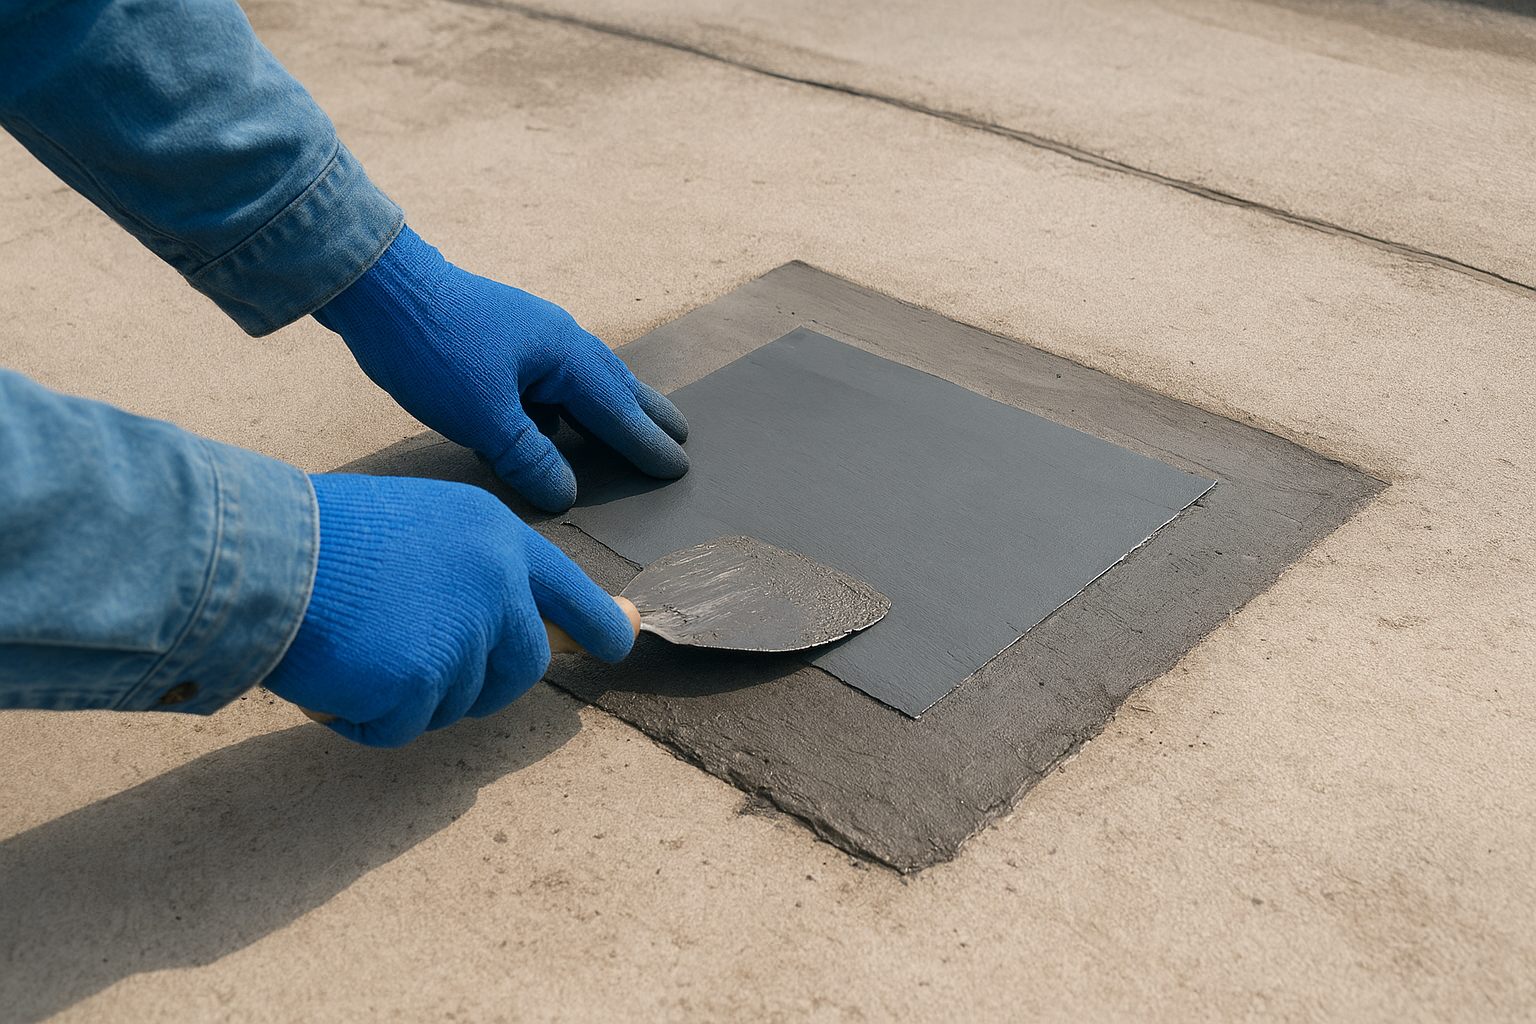
Each membrane type requires a specific repair approach and compatible products. Using the right materials for your roof means the difference between a patch that holds for years and one that lifts after a single heat cycle. Cut your patch material at least 6 inches larger than the damaged area on all sides to give the adhesive enough surface to grip.
Follow these steps based on your roof type:
TPO:
EPDM:
Modified Bitumen or Built-Up:
After applying any patch, press along every edge to confirm full contact with no lifted corners. Any gap at the edge becomes an entry point on the next rain. Give the repair at least 24 hours to cure before you test it for water tightness.
A successful patch only solves half the problem. If you don't address what caused the leak in the first place, you'll be back on the roof making the same repair within a year. Understanding how to repair a flat roof is only useful if you also know how to keep new damage from forming.
Standing water is the primary enemy of any flat roof. Water that sits for more than 48 hours after rain accelerates membrane degradation, adds structural weight, and finds every small gap in your repair work. After completing your patch, check your roof drains and scuppers and clear out any debris blocking water flow.
A clogged drain can turn a minor membrane issue into full deck saturation within one rainy season.
Build a simple biannual inspection routine to catch problems before they become leaks. Walk the roof each spring and fall, focusing on these areas:
Some flat roof conditions tell you clearly that a repair won't hold long-term. If you find widespread membrane shrinkage, large sections of saturated insulation beneath the membrane, or multiple blisters spread across the surface, a patch addresses the symptom but not the cause. Replacing a section or the full membrane is the more cost-effective path at that point, because repeated patching on a failing roof adds up fast without fixing the underlying problem.
Call a professional when you find any of these conditions:
Your time and repair materials have real value. If your roof is older than 15 to 20 years and showing widespread wear, an honest assessment from a licensed roofer will tell you whether repairs make financial sense or whether replacement is the better investment.
Now you know how to repair a flat roof, from tracing a leak back to its source to applying the right patch for your specific membrane type. The process works when you follow it in order: identify the damage correctly, prep the surface thoroughly, and use compatible materials for your roof. Skipping any of those steps is what turns a simple repair into a repeat problem.
If you've worked through this guide and found widespread membrane failure, rotted decking, or damage that keeps coming back, that's your sign the repair window has closed. At that point, the most cost-effective move is getting an honest professional assessment before you spend more time and money on patches that won't hold. Defend Roofing serves homeowners across Central Texas with documented, pressure-free roof evaluations so you know exactly what you're dealing with before you commit to anything. Get your flat roof assessed today.