Compare costs, timelines, and DIY vs pro options for replacement of roof projects in Central Texas, plus material lifespans and warranty tips.
You've spotted the curling shingles, the water stain on the ceiling, or the insurance adjuster's note that says it's time. Now you're staring down the replacement of roof on your Central Texas home and wondering what it actually costs, how long it takes, and whether you can handle any part of it yourself. Most homeowners get vague ballpark numbers from contractors and no real explanation of what drives the price up or down.
This guide breaks down real cost ranges by material and roof size, walks through the actual replacement process step by step, and gives you an honest answer on DIY versus hiring a licensed contractor for this specific job. Roofing isn't like painting a fence. One missed flashing detail or nail pattern can cost you thousands in leaks and voided warranties.
We've spent three generations climbing roofs across Austin, Cedar Park, and Leander, so we know where homeowners get burned on pricing and workmanship. You'll leave this article knowing what questions to ask, what red flags to watch for, and whether your roof truly needs replacing or just a targeted repair.
Before you spend a dime on a full roof replacement, figure out if your roof actually needs one. A lot of Central Texas homeowners get pushed into replacement when a targeted repair would have solved the problem. Others patch a roof three times in two years because nobody told them the underlying structure was already failing. The honest answer sits somewhere between those two extremes, and it depends on the age of your roof, the extent of the damage, and what's happening underneath the shingles, not just on the surface.
Granular loss in your gutters, daylight visible through the attic decking, and shingles that snap instead of bend are all signs the roof has moved past the repair stage. Widespread damage across multiple roof planes, rather than a single leak in one spot, usually means the whole system has aged out together. Here's what typically points toward full replacement:
If you're only dealing with a handful of cracked shingles after a windstorm, or a single flashing leak around a chimney, that's almost always a repair job. Replacing an otherwise healthy roof because of one localized issue wastes money you didn't need to spend.
A roof needs full replacement when the damage is systemic, not when it's just visible.
Age alone won't tell you everything, but it's the single biggest factor in whether repair still makes financial sense. A 5-year-old roof with storm damage is almost always worth repairing. A 22-year-old roof with the same damage is a different conversation entirely.
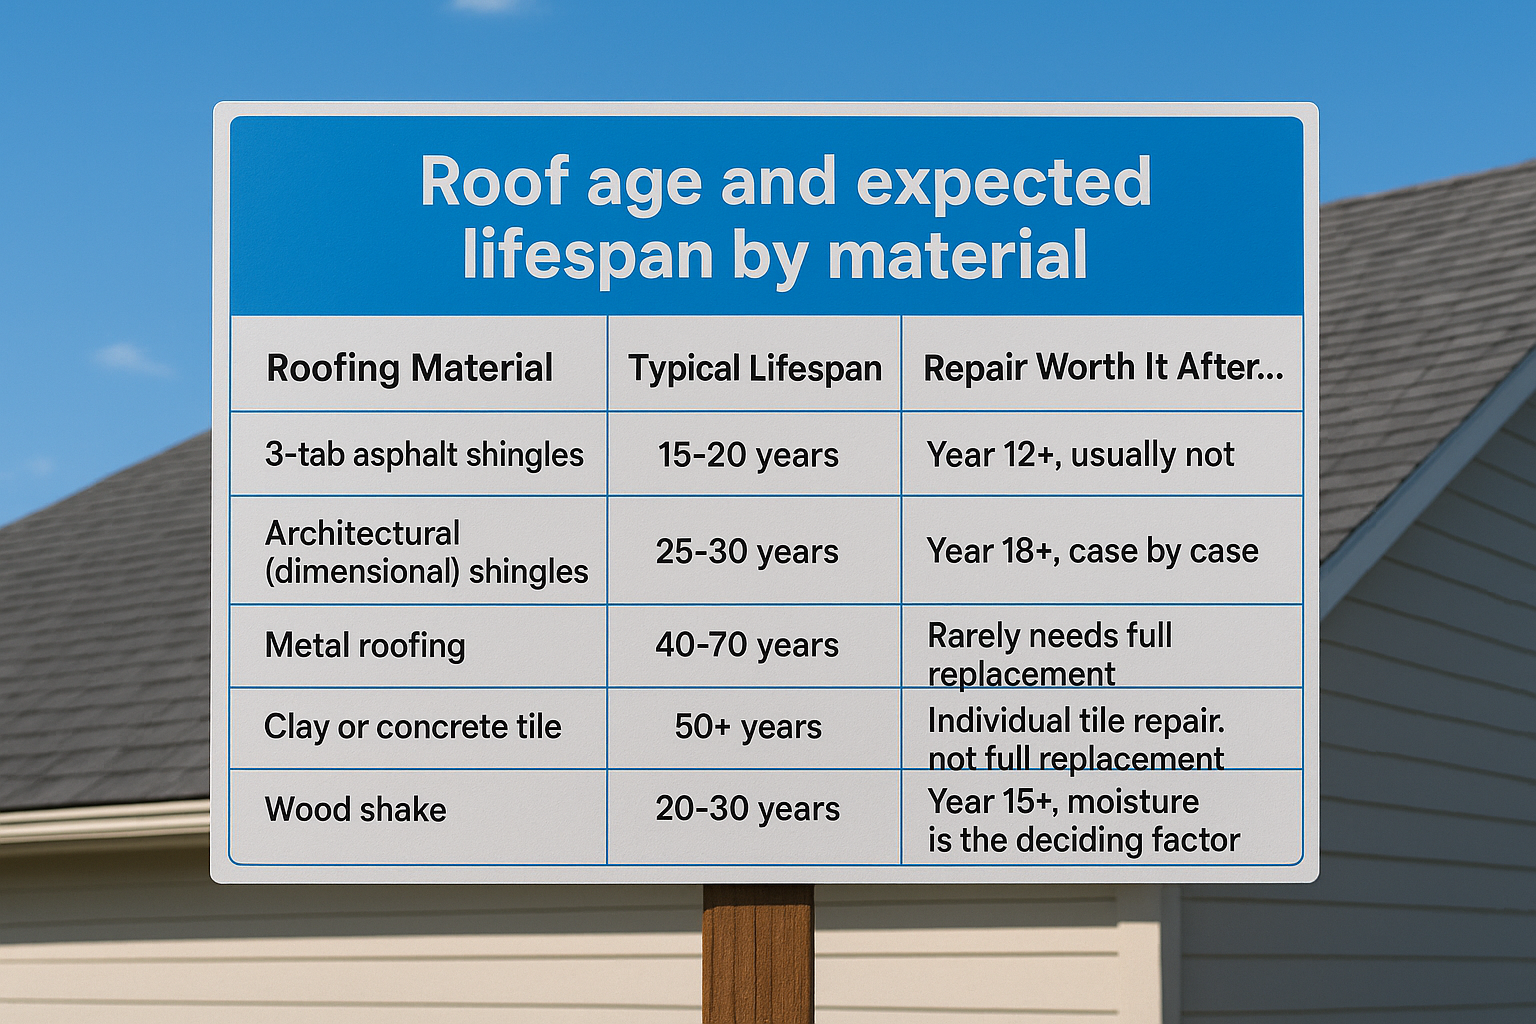
| Roofing Material | Typical Lifespan | Repair Worth It After... |
|---|---|---|
| 3-tab asphalt shingles | 15-20 years | Year 12+, usually not |
| Architectural (dimensional) shingles | 25-30 years | Year 18+, case by case |
| Metal roofing | 40-70 years | Rarely needs full replacement |
| Clay or concrete tile | 50+ years | Individual tile repair, not full replacement |
| Wood shake | 20-30 years | Year 15+, moisture is the deciding factor |
Manufacturer warranties often factor into this decision too. According to the U.S. Department of Housing and Urban Development, roofing materials installed under proper building codes should meet these minimum service life expectations, and falling well short of them usually points to an installation defect rather than normal wear.
Hail and wind events complicate the repair-versus-replace decision because damage isn't always visible from the ground. Bruised shingles can look fine for a year and then start leaking during the next heavy rain. This is exactly why we document every assessment with 100+ photos, so homeowners see the actual condition of their roof instead of taking someone's word for it. Documented damage also strengthens your position if you're filing an insurance claim, since adjusters respond to evidence, not descriptions.
Neither guessing nor assuming the worst serves you here. Get underneath the surface-level symptoms and look at what's actually driving them before you commit to a full tear-off. The next step walks you through exactly how a professional inspection uncovers that information.
Once you suspect a roof replacement is coming, don't skip straight to getting quotes. Start with a thorough inspection from someone who documents what they find instead of just telling you what they think. A rushed 10-minute walk-around from a salesperson isn't an inspection, it's a pitch. You want someone who actually climbs onto the roof, gets into the attic, and checks the flashing, valleys, and penetrations, not just the shingles you can see from the driveway.
A proper inspection looks at far more than surface wear. It should give you a full picture of the roof's structural condition, not just a list of missing shingles. Here's what should be on the checklist every time:
Photos protect you in two ways. First, they give you proof of the roof's actual condition instead of relying on a contractor's verbal summary, which can vary wildly depending on who's standing in front of you. Second, if you're filing an insurance claim, adjusters respond to visual evidence, not vague descriptions of "some damage." This is exactly why we run a Precision Roof Assessment with 100+ photos on every inspection we do. Homeowners walk away with a documented record, not just our word for it.
An inspection without photographic evidence is just someone's opinion of your roof.
Use the inspection visit to get specific answers, not general reassurances. A contractor who's confident in their findings will welcome these questions:
Getting straight answers here saves you from overpaying for unnecessary replacement or underestimating a problem that will resurface in six months. Once you know the real scope of the damage, you can move on to figuring out what it will actually cost to fix it.
Once you know the scope of the damage, the next question is what the cost of a roof replacement will actually run you. Prices swing widely based on material, roof size, pitch, and how much of the old roof has to come off before installation starts. A simple ranch-style home with a low-slope asphalt roof costs far less to redo than a steep, multi-plane roof with dormers and skylights, even if both roofs measure the same square footage.
Square footage matters, but it's not the only factor that moves your final number. Steep pitches slow down labor and require extra safety equipment, which adds cost even before materials enter the picture. Layers of old shingles that need tearing off, plywood decking that's rotted and needs replacing, and complicated rooflines with lots of valleys and penetrations all push the price higher. Here's a general cost range by material for an average 2,000 square foot roof in the Austin area:
| Material | Typical Cost Range (2,000 sq ft roof) |
|---|---|
| 3-tab asphalt shingles | $8,000 - $11,000 |
| Architectural shingles | $10,500 - $15,000 |
| Metal roofing (standing seam) | $18,000 - $28,000 |
| Clay or concrete tile | $22,000 - $35,000 |
| Wood shake | $16,000 - $24,000 |
The material you pick affects your budget more than almost any other decision you'll make on this project.
Quotes that look identical on paper often hide differences in what's actually included. Decking replacement, code-required upgrades like ice and water shield or improved attic ventilation, and disposal fees for the old roofing material can all show up as add-ons after the contract is signed. Ask for a written, itemized quote that spells out labor, materials, decking repair allowances, and disposal separately, so nothing surprises you halfway through the job.
If storm damage caused the need for replacement, your homeowner's insurance policy may cover most of the cost minus your deductible. This is where the photo documentation from your inspection becomes critical, since adjusters approve or deny claims based on evidence. If the replacement isn't storm-related, financing options through your contractor can spread the cost over monthly payments instead of one lump sum. Either way, get your numbers locked down before you start comparing materials, because your budget will narrow your options in the next step.
With your budget in hand, the material decision gets a lot more concrete. Central Texas weather throws hail, triple-digit summer heat, and sudden downpours at your roof every year, so material selection should weigh climate performance just as heavily as upfront cost. Picking the cheapest option without considering how it holds up to Hill Country storms often means paying for another replacement of roof materials a decade sooner than you should.
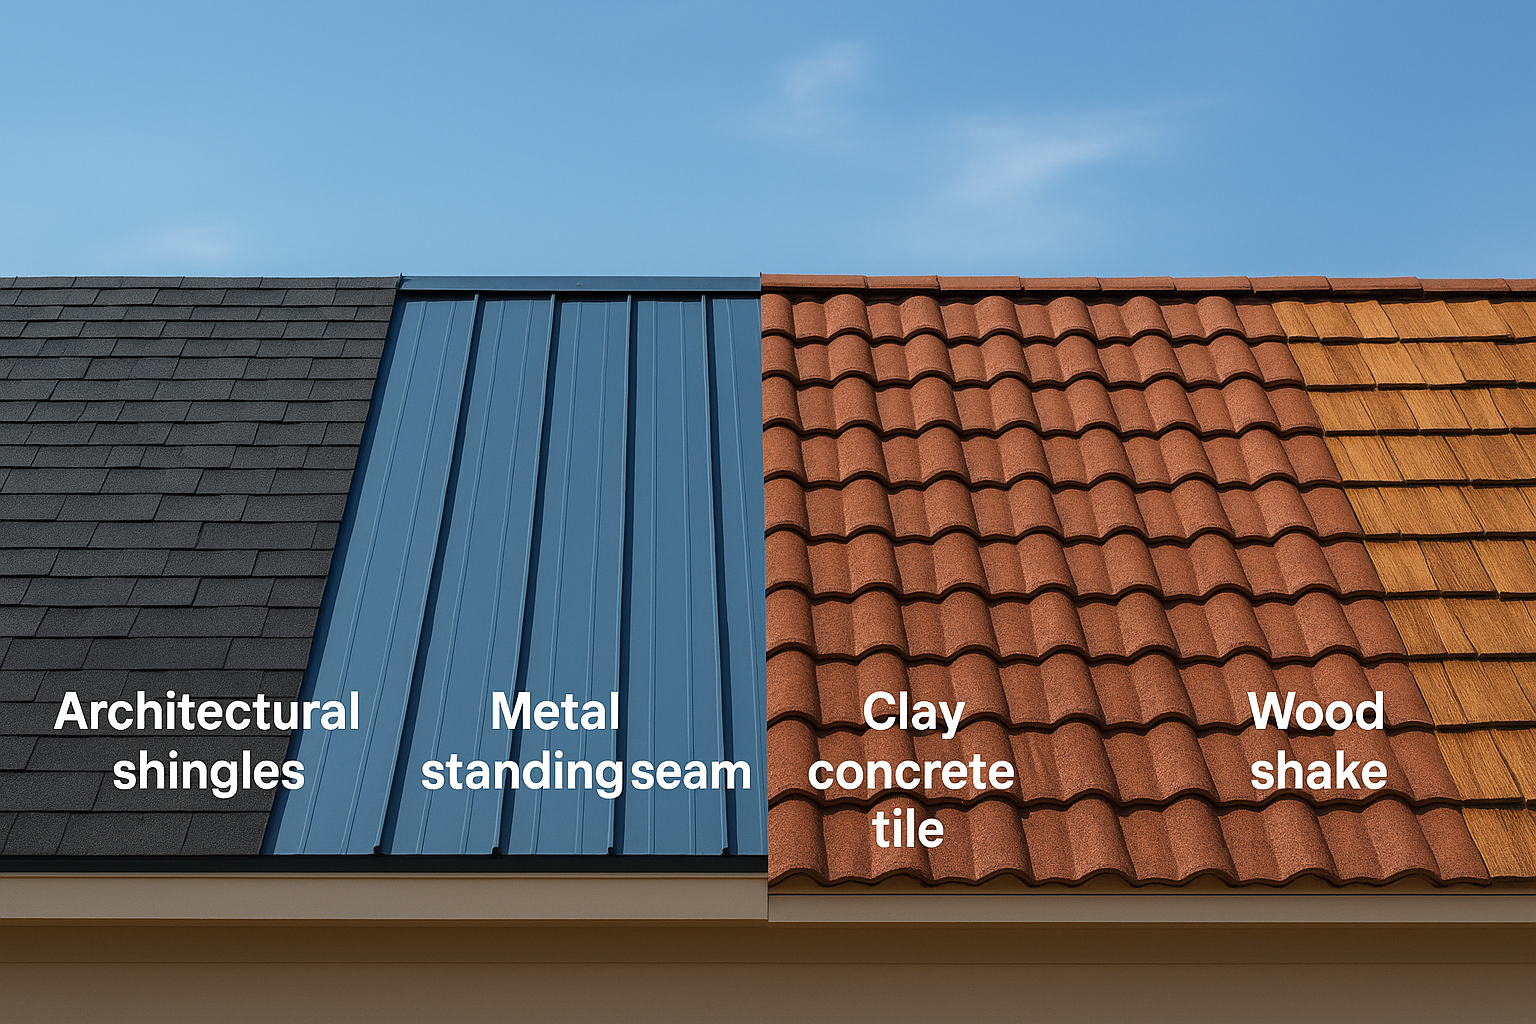
Architectural shingles remain the most common choice for Austin-area homes because they balance cost, impact resistance, and a 25 to 30 year lifespan reasonably well. Metal roofing costs more upfront, but it shrugs off hail better than shingles and can outlast three shingle roofs over its lifetime, which matters if you plan to stay in the home long term. Clay and concrete tile perform beautifully in Texas heat but add significant structural weight, so your roof deck and framing need to support that load before you commit.
The right material balances your budget today against how many storms you expect to weather over the next 20 years.
Here's how the main choices stack up on the factors that actually matter in Central Texas:
| Material | Hail Resistance | Heat Performance | Lifespan | Best For |
|---|---|---|---|---|
| Architectural shingles | Moderate | Good with proper ventilation | 25-30 years | Most homeowners balancing cost and durability |
| Metal (standing seam) | Excellent | Excellent, reflects heat | 40-70 years | Long-term homeowners, high hail areas |
| Clay/concrete tile | Good | Excellent | 50+ years | Homes with reinforced structure |
| Wood shake | Poor | Fair | 20-30 years | Aesthetic priority over storm resistance |
Don't just compare price tags between materials. Compare what's actually backed by a warranty. Manufacturer warranties on materials typically cover defects in the product itself, while a workmanship warranty from your contractor covers installation errors, which cause far more leaks than defective shingles ever do. Ask any contractor for their warranty terms in writing before you sign anything, and confirm whether it's a limited lifetime warranty or one that prorates coverage down after the first several years. Once you've settled on a material that fits your climate, budget, and warranty expectations, you're ready to tackle the next decision: whether this is a job you handle yourself or hand off to a licensed crew.
Homeowners ask us about DIY roof replacement more often than you'd think, usually after pricing out materials and doing quick math on labor savings. Tackling a roof replacement yourself can shave thousands off a quote, but the risks stack up fast once you're actually standing on a steep pitch in August heat with a nail gun in your hand. Before you decide, weigh the real tradeoffs, not just the sticker price difference.
Skipping labor costs is the obvious appeal, and on a straightforward gable roof, that can mean saving 40 to 60 percent of the total project cost. But roofing injuries send more people to the ER every year than almost any other home improvement task, according to the Consumer Product Safety Commission, and falls from roofs account for a large share of those. Beyond safety, a botched nail pattern or missing underlayment detail voids manufacturer warranties instantly, which means you're on your own if leaks show up two years later.
Saving money on labor means nothing if a warranty voided by DIY installation costs you a full replacement later.
Greyson and his crew have climbed enough roofs to know exactly where amateur installs fail first: flashing details around chimneys and valleys, nail placement that misses the shingle's nailing zone, and ventilation gaps that trap moisture in the attic. A licensed contractor carries insurance that covers accidents on your property, something a DIY job leaves entirely on your shoulders. Contractors also pull permits correctly, schedule inspections, and know local code requirements that change based on wind zones and roof pitch, details that trip up even experienced DIYers.
| Factor | DIY | Licensed Contractor |
|---|---|---|
| Upfront cost | Lower | Higher |
| Manufacturer warranty | Often voided | Fully protected |
| Workmanship warranty | None | Included (often lifetime) |
| Insurance coverage for accidents | None | Contractor-provided |
| Time to complete | Days to weeks | 1-3 days typically |
| Permit and code compliance | Your responsibility | Handled for you |
Roof steepness, complexity, and your own comfort with heights should drive this decision as much as budget. If your roof has a low pitch, simple layout, and you've got experience with basic construction, DIY isn't impossible. But for anything with multiple planes, dormers, or a pitch steeper than 6:12, hiring a pro protects both your safety and your investment. Once you've made that call, the next step covers what needs to happen before anyone sets foot on the roof.
Before any crew touches your shingles, the paperwork and property prep have to happen first. Skipping this step is how projects stall mid-job or run into fines after the fact. Central Texas municipalities each handle roofing permits a little differently, and Austin, Cedar Park, and Leander all have their own inspection schedules, so don't assume your contractor's standard process automatically covers your specific address.
Getting a permit isn't optional for a replacement of roof in most Central Texas jurisdictions, and skipping it can void your homeowner's insurance coverage if something goes wrong later. A licensed contractor pulls the permit, schedules the required inspections, and confirms your roof meets current wind zone and fastening requirements, which change depending on your specific location. If you're managing the project yourself, contact your city's building department directly and ask what documentation they need before work starts, since requirements shift based on roof pitch, material, and whether structural decking is being replaced.
Skipping the permit step doesn't save you money, it just delays the bill until something goes wrong.
Many Central Texas neighborhoods, especially newer developments around Cedar Park and Steiner Ranch, have HOA guidelines that restrict shingle color, material type, or even the timeline for completing exterior work. Submit your material selection to the HOA architectural committee before ordering supplies, since a rejected submission after the roof is already installed creates a real headache.
Once permits and approvals are in place, turn your attention to the property itself. A little prep work protects your landscaping, vehicles, and your own sanity during the noisiest part of the project. Here's what to handle in the days before tear-off begins:
Taking these steps ahead of time keeps the job moving on schedule instead of pausing while your crew waits on you to clear the driveway. With permits filed and your property ready, the next step covers what actually happens once the old roof comes off.
With permits filed and your property cleared, the physical work finally starts. Tear-off day is the loudest, messiest part of the entire project, and knowing what happens at each stage helps you set realistic expectations for timeline and cleanup instead of wondering if something's going wrong.
Your crew starts by stripping the old shingles, underlayment, and any damaged flashing down to the decking. This is where hidden problems surface, since rotted plywood or soft spots often stay invisible until the surface layer comes off. A reputable contractor stops and shows you photos of any decking damage before replacing it, rather than quietly adding it to the invoice later. Expect this stage to generate a lot of noise, dust, and debris, which is why the property prep from the last step matters so much.
Once the deck is confirmed solid, installation follows a specific order that protects the roof for decades if it's done right:
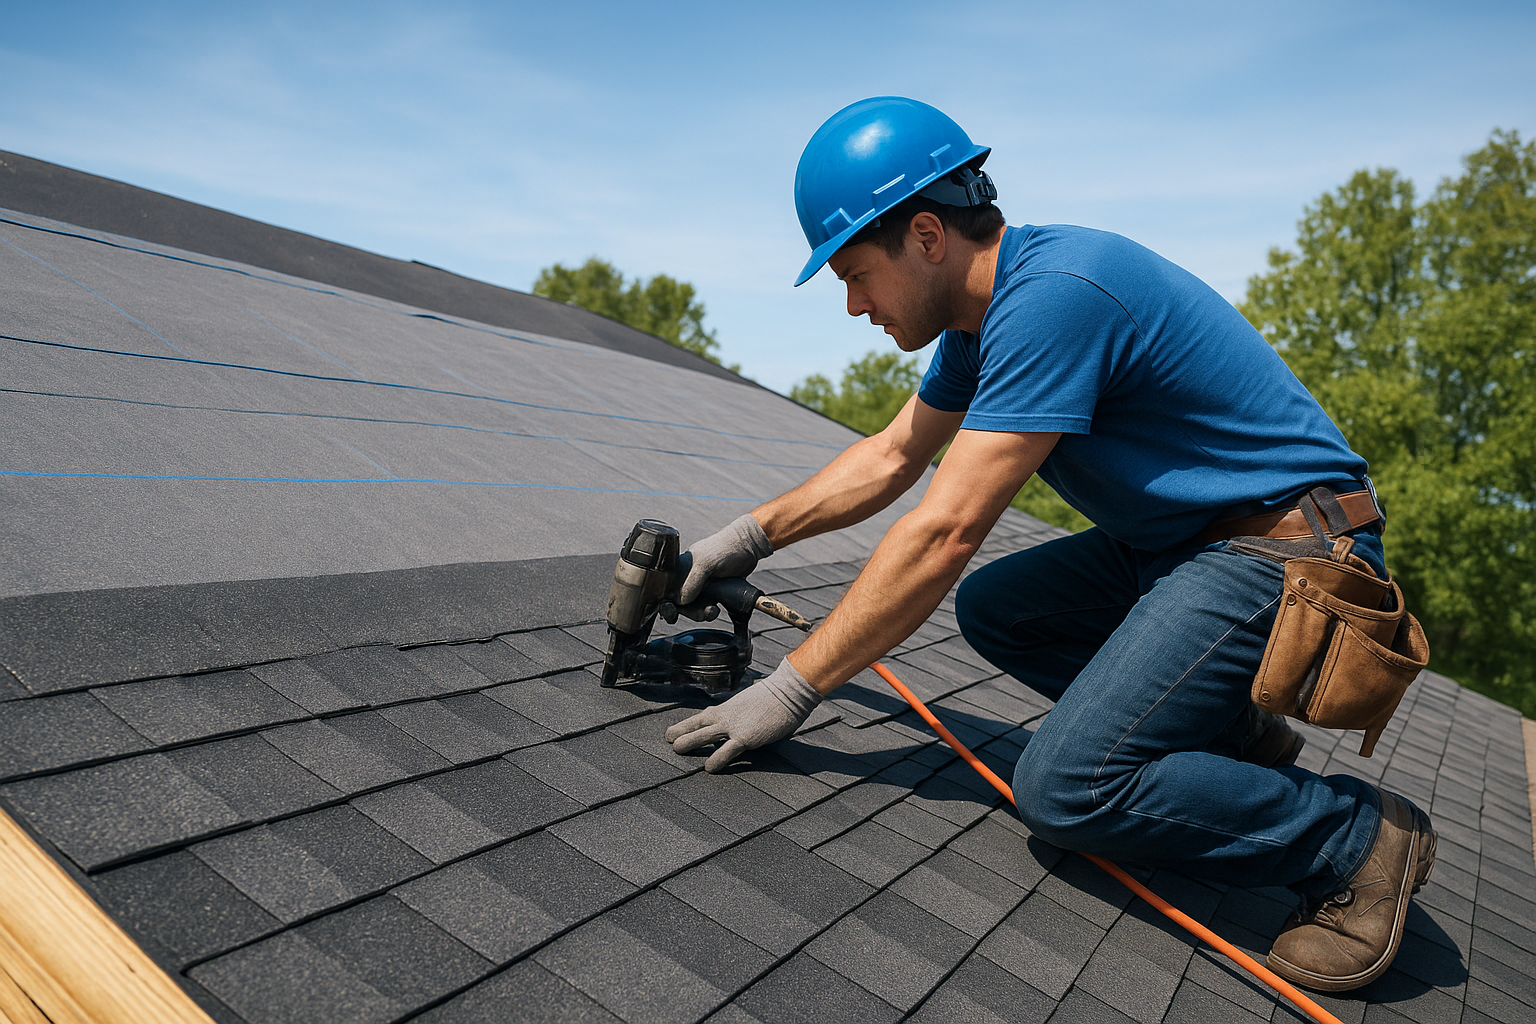
A roof only performs as well as its weakest installation step, and that's almost always a detail you can't see from the ground.
Skipping or rushing any step in this sequence is exactly how warranty claims get denied years later, so this isn't the place to accept shortcuts even if it means an extra day on the schedule.
After installation wraps, a final inspection should happen in two parts. First, the local building inspector confirms the work meets code, which is required before your permit closes out. Second, your contractor should walk the property with you, pointing out completed work, confirming cleanup, and checking that gutters, downspouts, and yard debris are fully cleared. Ask for photos of the finished roof, especially flashing and ridge details, as part of your final documentation. This is also when you should receive your written workmanship warranty and any manufacturer registration paperwork. Don't consider the job finished until you have both in hand.
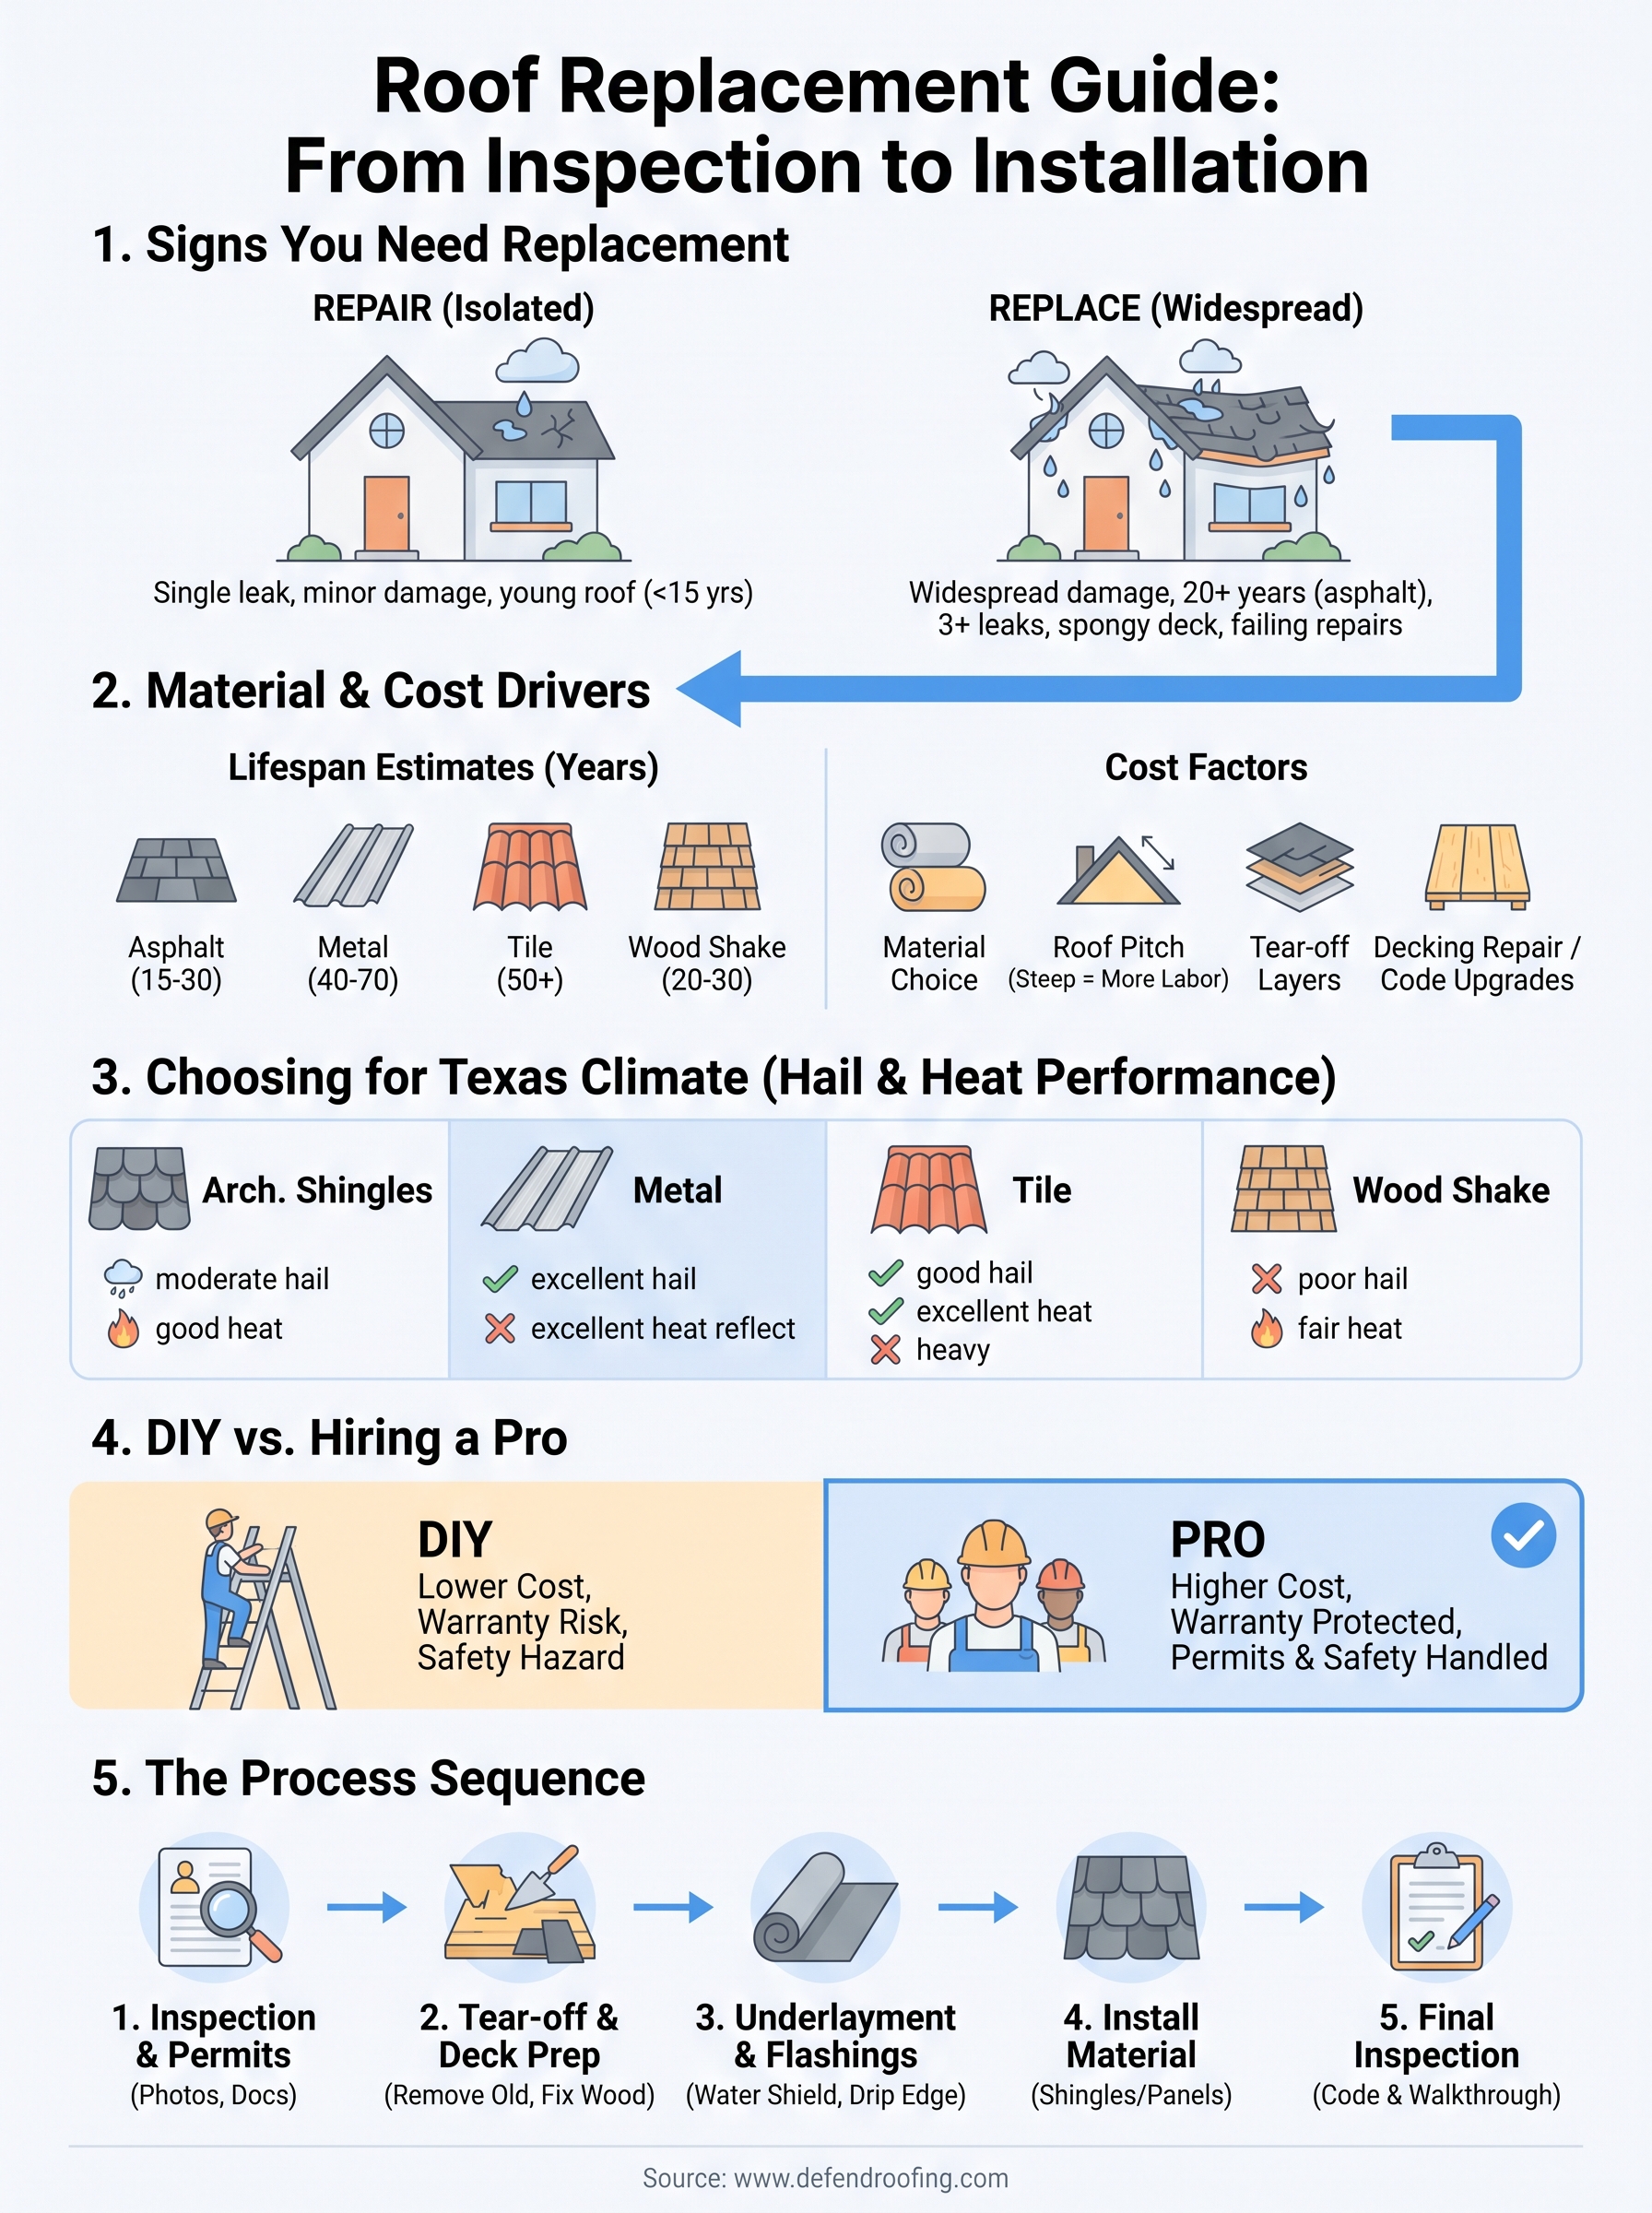
A roof replacement comes down to a handful of decisions: whether you actually need one, what material fits your climate and budget, and who you trust to install it correctly. Skip the inspection step or rush the material choice, and you'll pay for it years later in leaks, voided warranties, or a roof that fails a decade before it should. Central Texas weather doesn't give you much room for shortcuts, and neither should your contractor.
Getting straight answers up front, backed by photo documentation instead of guesswork, is what separates a roof that lasts 30 years from one that needs another repair call by next spring. If you're ready to get real numbers instead of vague estimates, reach out for an instant online quote and talk to a crew that's spent three generations doing this work right.