Stop water damage in your Austin home. Identify the causes of a roof leak around chimney and learn how to fix flashing, crickets, and masonry issues.
A roof leak around chimney areas is one of the most common, and most frustrating, problems Austin homeowners deal with. Water stains on the ceiling near your chimney, damp drywall, or moisture in the attic all point to the same thing: something around that chimney penetration has failed. And in Central Texas, where hail, wind-driven rain, and intense UV exposure are routine, chimney-related leaks tend to show up faster than in milder climates.
The tricky part is figuring out exactly why it's leaking. The chimney itself might look fine from the ground, but the real problems, cracked flashing, deteriorated sealant, damaged mortar, hide in places most homeowners can't easily see. Pinpointing the actual cause matters because the fix for bad flashing is completely different from the fix for a cracked chimney crown, and misdiagnosing the issue wastes time and money.
At Defend Roofing, our father-and-son team has seen every version of chimney leak across Austin-area homes. Every inspection we run includes 100+ detailed photos so you can see exactly what's happening on your roof, no guesswork, no pressure. Below, we'll walk through the six most common causes of chimney leaks and what it takes to fix each one properly.
Before you spend money on any repair, you need to know exactly what you're fixing. A roof leak around chimney penetrations can have multiple causes happening at the same time, and treating one while missing another means you'll be back on the phone with a roofer within a season.
Chimney leaks are deceptive. Water entry points and where the damage shows up inside your home are often in completely different locations. Water can travel along rafters, pool in low spots, and drip through drywall ten feet from where it entered. Without a targeted inspection focused on the chimney and the surrounding roof plane, you risk chasing symptoms instead of solving the actual problem.
Identifying the true source of a chimney leak before any repair work begins is the single most important step in getting a fix that holds.
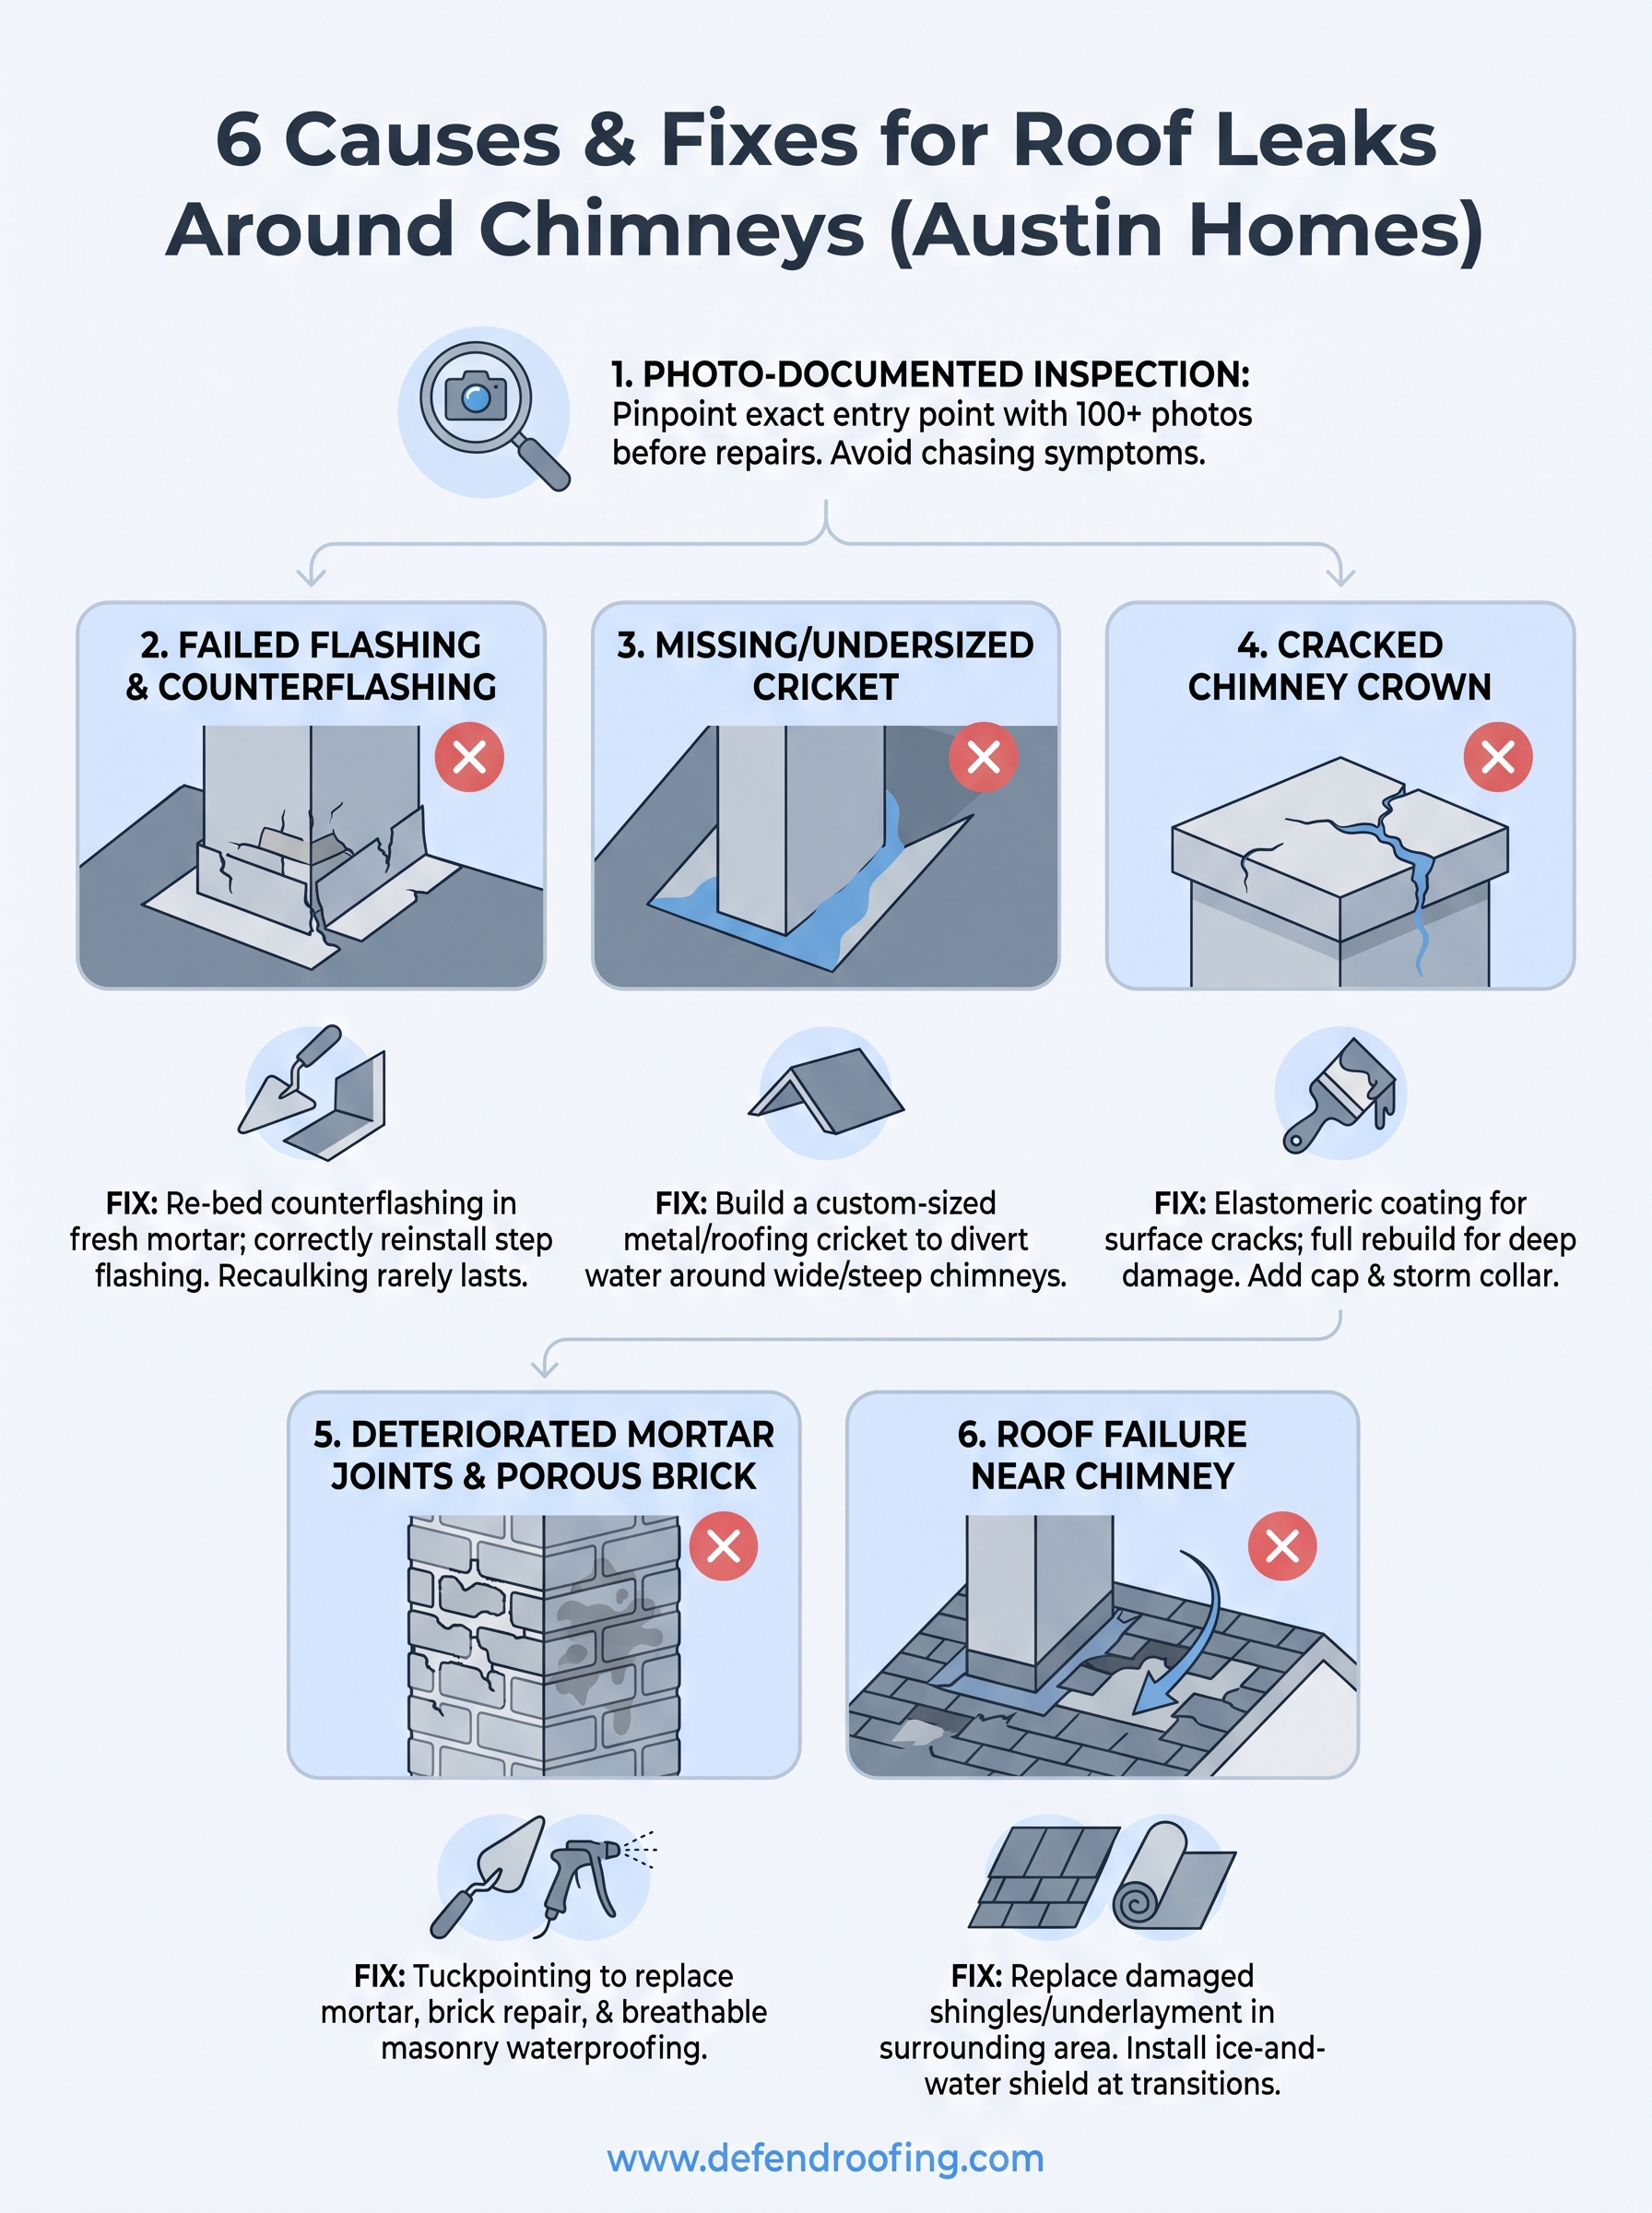
A solid inspection covers more than a quick look at the flashing. Your roofer should examine the step flashing, counterflashing, and any sealant points along all four sides of the chimney. They should also check the chimney crown, mortar joints, and the condition of shingles in the transition zone around the base. Valleys and underlayment near the chimney deserve a close look too, since those areas collect and redirect significant water volume during heavy rain.
Every inspection Defend Roofing runs includes 100+ photos that walk you through each problem area in plain terms. You see the cracked flashing, the gap in the counterflashing, the soft decking, whatever the roof is showing, before any repair decision gets made. Clear photo documentation also helps if an insurance claim becomes part of the conversation.
Most chimney-related issues are isolated repair scenarios, not full replacement triggers. If the flashing has failed but the surrounding shingles are in good shape, you repair the flashing. If you find significant decking damage or widespread shingle deterioration spreading out from the chimney area, your roofer should walk you through why a broader replacement makes more sense financially in the long run.
Flashing failures are the most common source of a roof leak around chimney areas in Austin homes. The metal system sealing the joint between your chimney and roof expands, contracts, and flexes with every temperature swing, and Central Texas heat accelerates that breakdown faster than most homeowners expect.
Properly installed chimney flashing uses two layers working together: step flashing woven into the shingles along the sides, and counterflashing embedded into the mortar joints above it. Water running down the chimney face hits the counterflashing and gets directed out onto the roof surface, away from the joint.

UV exposure and thermal cycling pull sealant away from counterflashing edges. Mortar joints holding the counterflashing loosen over time, creating gaps where water enters directly. On the sides, improperly overlapped step flashing allows water to wick underneath during heavy rain.
When flashing fails on multiple sides at once, interior damage spreads quickly before you notice a stain on the ceiling.
Look for rust streaks running down the chimney face from the flashing line. Check your attic with a flashlight after rain for active drips near the chimney base. Bubbling or lifting sealant visible from the ground also signals a failing seal.
Caulk can close a small isolated gap, but it degrades fast under Austin sun. A proper flashing repair means removing damaged sections, re-bedding counterflashing into fresh mortar, and reinstalling step flashing with correct overlap. Simply recaulking over failed flashing without fixing the underlying joint typically fails within one to two seasons.
A chimney cricket, also called a saddle, is a small peaked structure built on the uphill side of the chimney where it meets the roof. Without one, water and debris collect directly behind the chimney every time it rains. On any chimney wider than 30 inches, most building codes require a cricket, and best practice recommends one for anything narrower that sits on a steep pitch.
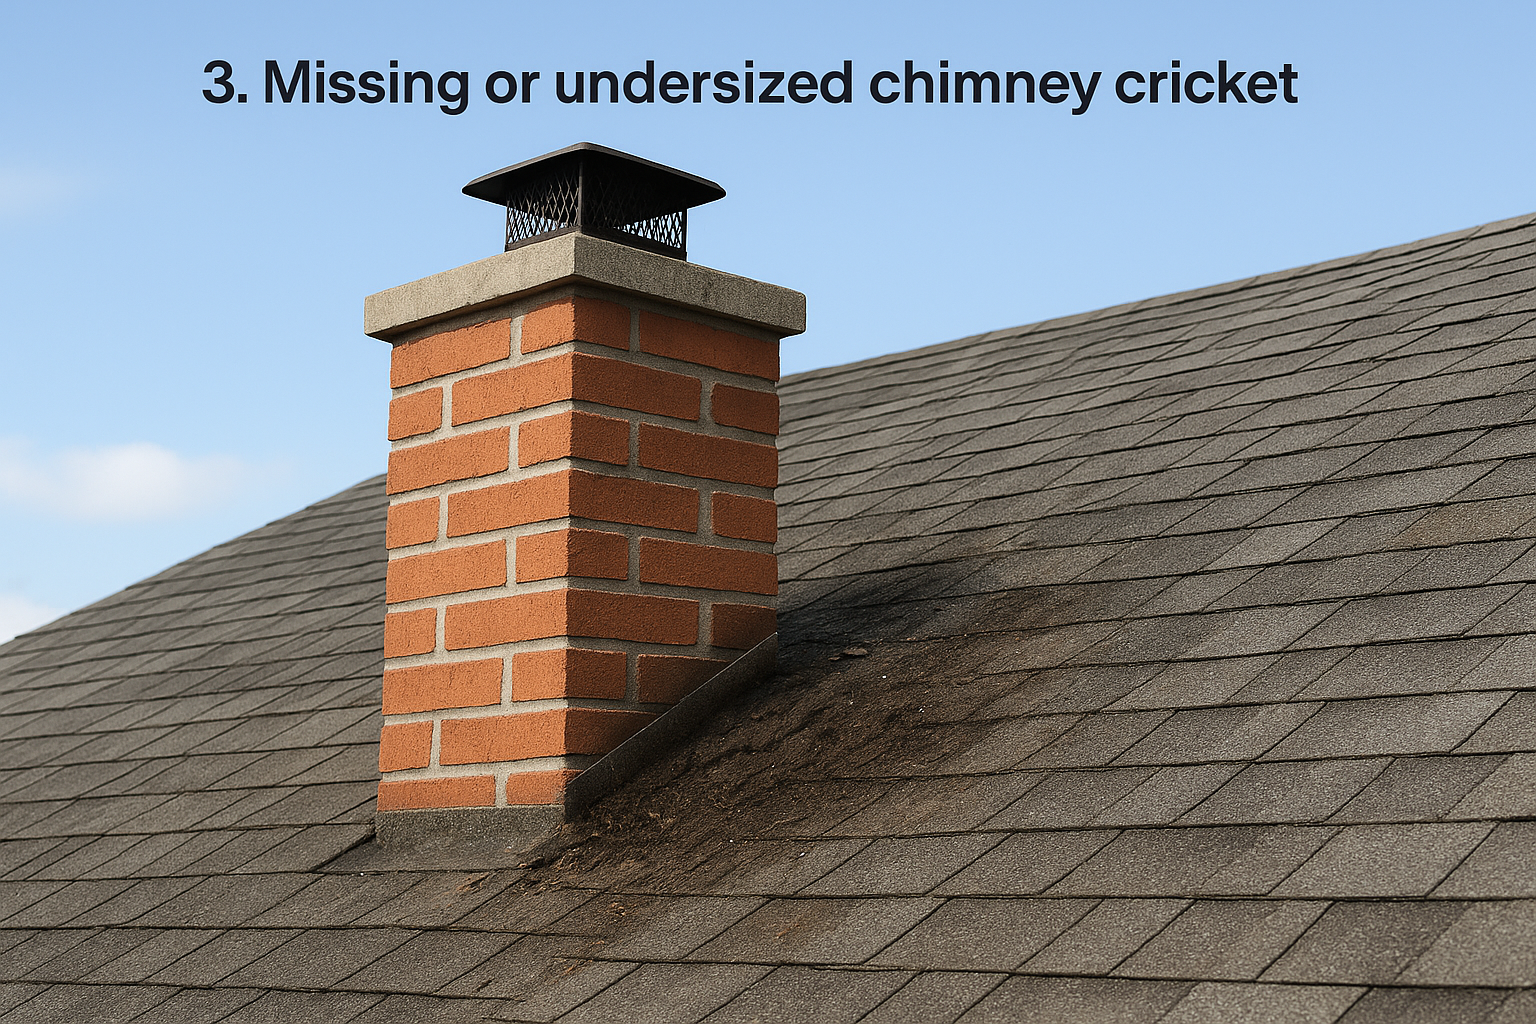
Central Texas storm systems regularly push high-velocity, wind-driven rain horizontally across rooflines, and the uphill pocket behind your chimney becomes a direct collection point. That standing water has nowhere to go quickly, which forces moisture under shingles and through any small gap in the transition zone.
Without a properly sized cricket, even a moderate storm can push enough water behind the chimney to saturate the underlayment and reach the decking.
If your roof leak around chimney consistently shows up on the ceiling directly above or behind the fireplace, the uphill side is usually where to look first. You may also notice debris and granule buildup packed against the back of the chimney after heavy storms, which confirms water is pooling there.
A roofer builds a cricket using sheet metal or roofing material shaped to redirect water around both sides of the chimney base. The pitch and dimensions of the cricket must match your existing roof slope and chimney width to perform correctly over the long term.
The chimney crown is the concrete or mortar slab that covers the top of the chimney structure, leaving only the flue opening exposed. When it cracks, water enters from above and travels downward through the masonry, eventually producing what looks like a roof leak around chimney areas even though the actual failure sits at the very top.
A solid crown sheds rain away from the masonry below it. Once cracks develop, water penetrates the chimney body, saturates the brick and mortar from the inside, and works its way down to the roofline.
Central Texas rainfall can push significant water volume into even hairline crown cracks during a single storm.
Thermal cycling from intense summer heat followed by cooler wet seasons accelerates crown cracking faster than in milder climates, so Austin homeowners tend to see this failure earlier than expected.
You may notice dampness inside the firebox, staining on walls near the fireplace, or water dripping from the damper after rain. These symptoms closely resemble flashing failures and are frequently misdiagnosed as such.
Surface cracks respond well to a flexible elastomeric crown coating applied directly over the existing structure. Deep cracking or a deteriorating crown requires full removal and a fresh pour with correct overhang and slope built in to direct water clear of the masonry.
A chimney cap blocks direct rain entry at the flue opening, and a storm collar seals around the flue liner. Both additions reduce water intrusion but do not substitute for a properly rebuilt crown.
The chimney itself can be the source of a roof leak around chimney areas even when the flashing and crown look intact. Brick and mortar are porous materials that absorb moisture over time, and once the masonry starts pulling in water, it releases that moisture slowly into the surrounding structure near your roofline.
Older brick chimneys lack the water-resistant coatings used in modern construction. As mortar joints crack and open up, water seeps deep into the chimney body and travels downward until it finds an exit point near the roof deck or ceiling below.
Central Texas temperatures swing hard between seasons. Daytime heat draws moisture into masonry, and cooler overnight temperatures during winter months cause that moisture to expand, widening existing cracks. Repeated cycles break down mortar joints faster than most homeowners expect.
Once mortar starts pulling away from brick faces, water infiltration accelerates with each rain event.
Tuckpointing removes deteriorated mortar and replaces it with fresh material matched to the existing joint profile. For damaged brick faces, breathable masonry waterproofing applied by a qualified contractor gives long-term protection without trapping moisture inside the chimney body.
White staining (efflorescence) on the chimney face signals active water movement through the masonry. Waiting increases your repair cost significantly, so act quickly if you notice any of these:
Sometimes what looks like a roof leak around chimney areas has nothing to do with the chimney itself. Shingles, underlayment, and decking in the surrounding roof plane can fail independently and send water toward the chimney base, making the chimney appear to be the source when it isn't.
Cracked or missing shingles within a few feet of your chimney allow water to reach the underlayment, which deteriorates quickly under UV exposure. Once the underlayment fails, water moves to the decking and follows the path of least resistance toward the chimney base.
Roof valleys that run toward or past a chimney collect and concentrate large water volumes during rain. Transition zones where two roof planes meet near a chimney are especially vulnerable because water velocity increases and forces moisture under shingles.
If your ceiling stain appears near the chimney but shifts location between rainstorms, the problem likely lives in the surrounding roof plane rather than the chimney structure itself.
Water entering an attic flows along rafters and sheathing before it drips through. Your actual entry point can sit six or more feet away from the ceiling stain you see inside.
Checking your attic with a flashlight after rain gives you the fastest path to finding where water actually enters, rather than just where it lands.
Fixing roof plane failures near a chimney means replacing damaged shingles and underlayment in the affected zone. Your roofer should also install ice-and-water shield in vulnerable transition areas to prevent the same failure from recurring.
A roof leak around chimney areas rarely fixes itself, and every rain event that passes without a repair adds to the damage below the surface. The six causes covered above each require a different fix, which is why getting the diagnosis right matters more than moving fast toward any particular repair.
Your first step is a professional inspection that gives you clear evidence of what's actually failing. Photo documentation lets you understand the problem before you commit to a repair, and it protects you if an insurance claim becomes part of the process. If you're in the Austin area, Defend Roofing runs a 100+ photo Precision Roof Assessment on every inspection so you see exactly what's happening on your roof in plain terms.
Ready to stop guessing and get a straight answer? Schedule your chimney leak inspection with Defend Roofing and we'll document everything we find before recommending any repair.