Learn how to get insurance to pay for roof replacement in Texas. Document storm damage, handle adjusters, and secure the settlement you deserve.

Your roof took a hit from a Texas hailstorm, and now you're staring at damage you know isn't cheap to fix. The natural next question: how to get insurance to pay for roof replacement instead of covering it all out of pocket. It's a reasonable expectation, that's what you've been paying premiums for, but the process is rarely as straightforward as it should be.
Texas homeowners deal with more storm-related roof claims than nearly any other state, and insurance companies know it. Adjusters are trained to minimize payouts. Documentation gaps work against you. And if you don't understand what qualifies as covered damage versus normal wear, you can lose thousands before the process even starts. The good news is that a legitimate claim backed by solid evidence gets paid, you just need to know how to build one.
At Defend Roofing, we've spent three generations helping Central Texas homeowners navigate exactly this situation. Chris and Greyson Buster work with insurance adjusters regularly, and every project starts with a 100+ photo Precision Roof Assessment that gives you (and your insurance company) clear, documented proof of your roof's condition. We've seen what gets claims approved and what gets them denied, and most denials come down to avoidable mistakes.
This guide walks you through the full process step by step: identifying qualifying damage, filing your claim correctly, working with adjusters, and making sure you get the coverage your policy provides. No tricks, no loopholes, just a clear path from damage to a paid replacement.
Most homeowners insurance policies in Texas cover roof damage caused by sudden, accidental events. That means if a hailstorm tears through your neighborhood or a windstorm strips shingles off your roof, your policy is generally designed to step in and cover the cost of repair or full replacement. The key word is "sudden" because insurers draw a hard line between storm damage and damage that built up over years of weathering.
In Texas, wind and hail are the most common triggers for a covered roof claim, and policies sold here are specifically written with those perils in mind.
Texas homeowners policies are typically written as HO-3 or HO-5 open-peril policies, which means they cover all causes of roof damage except those explicitly listed as exclusions. That structure works in your favor because the burden falls on the insurer to point to a specific exclusion rather than on you to prove coverage. In practical terms, most standard Texas policies cover:
Each of these perils can qualify you for a full roof replacement if the damage is widespread enough. Your adjuster will assess the number of damaged squares (one roofing square equals 100 square feet), and once that damage crosses your insurer's threshold, replacement becomes the standard remedy instead of a patch repair.
Understanding exclusions is just as important as knowing what's covered. Most standard Texas policies will not pay for roof replacement when the damage falls into one of these categories:
Cosmetic damage is another exclusion that catches many Texas homeowners off guard. Some insurers include endorsements that specifically exclude cosmetic hail damage, such as dents to metal components that don't compromise waterproofing. If your policy carries this endorsement, minor dings to gutters or ridge caps may not qualify even after a significant storm. Check your policy documents for the words "cosmetic damage exclusion" before you assume everything is covered.
Your settlement amount depends heavily on whether your policy pays replacement cost value (RCV) or actual cash value (ACV). RCV policies pay what it actually costs to replace your roof at current material and labor prices. ACV policies subtract depreciation based on your roof's age and condition before the insurer cuts you a check, which can leave you thousands of dollars short on an older roof.
In Texas, many insurers have shifted toward ACV policies for roofs, particularly for homes with aging shingles. Pull out your declarations page and find the section that describes your roof's loss settlement method. If it says ACV, factor that depreciation gap into your budget before the claim process begins. Knowing this detail upfront is a core part of understanding how to get insurance to pay for roof replacement effectively, because your coverage type directly shapes what you receive at every stage that follows.
Before you file anything, you need to know whether the damage you're looking at qualifies as a covered loss or falls under the wear-and-tear exclusion. Filing a claim for non-covered damage doesn't just result in a denial; it can also flag your policy for review and affect your rates going forward. This first step protects your claim from the start and sets the foundation for how to get insurance to pay for roof replacement correctly.
Storm damage and aging look different once you know what to check for. Hail impact marks on asphalt shingles typically appear as dark, circular bruising with granule loss concentrated at the point of impact. You can often feel the soft spot with your thumb where the mat underneath has been compromised. Wind damage shows up as lifted or missing shingles, creased shingles along the edges, or adhesive strips that have separated from the shingle beneath. These are event-driven patterns tied to a specific storm, not gradual deterioration.
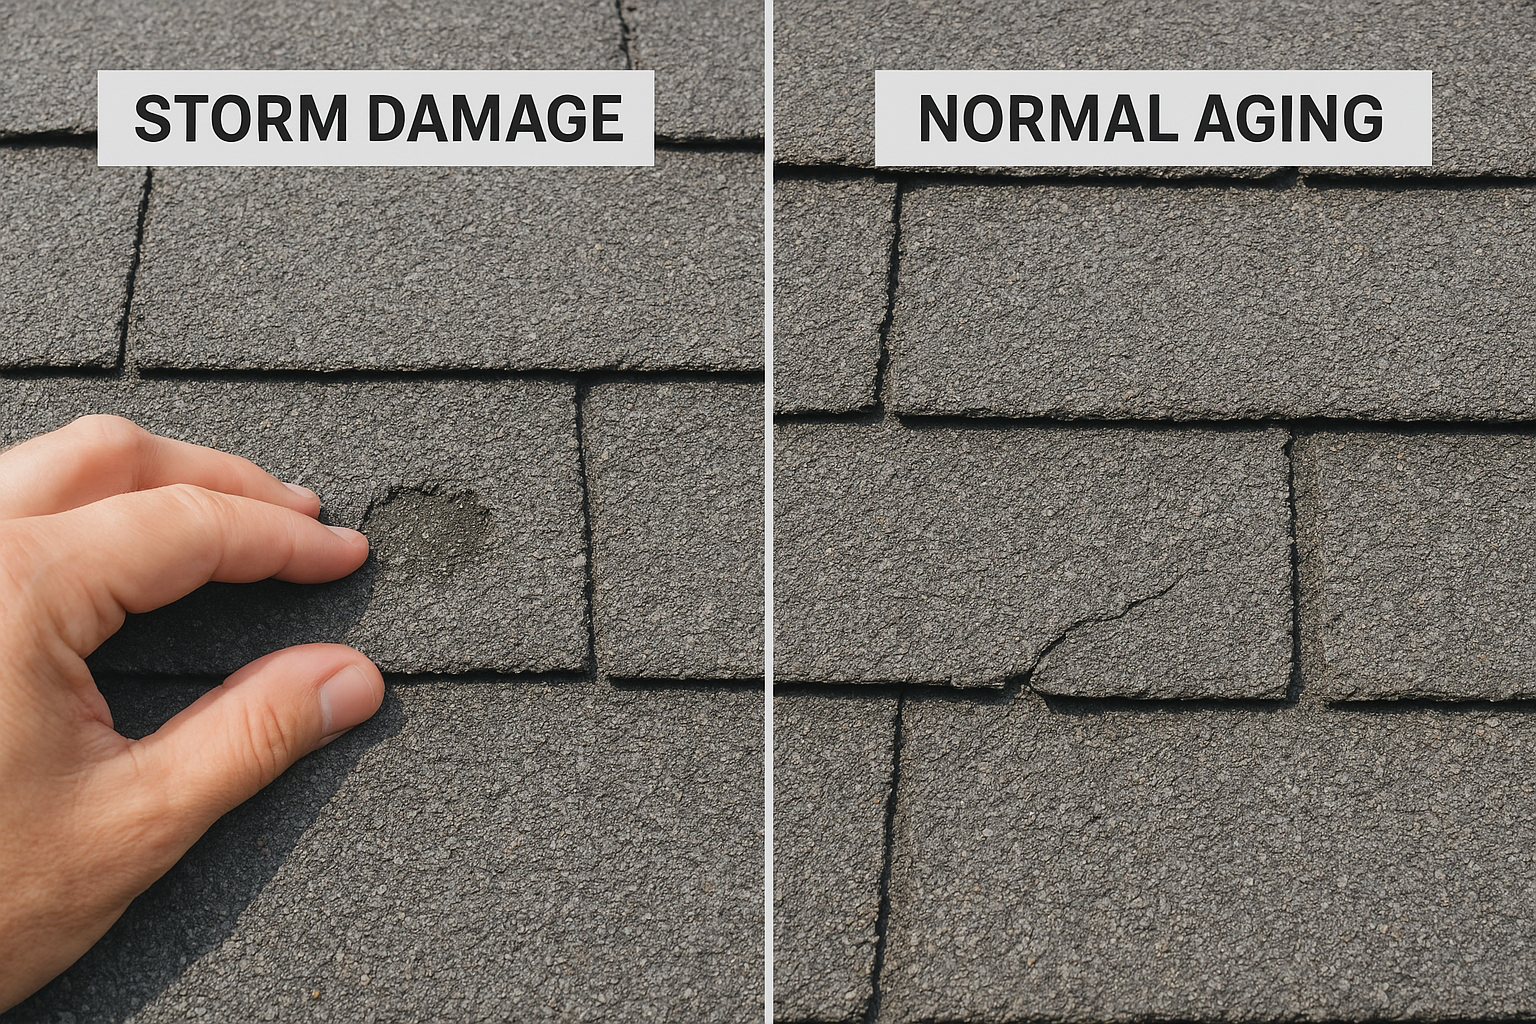
If you see uniform granule loss spread evenly across the entire roof surface, or shingles curling consistently on all slopes, that points to aging, not storm damage, and a claim built on that evidence will likely get denied.
Normal aging looks like widespread granule accumulation in your gutters, shingles curling at the edges or corners, and surface cracking that has no clear impact point. You may also notice shingles losing flexibility and becoming brittle across large sections. These signs spread across multiple slopes and don't tie back to a recent weather event.
Walk the perimeter of your home and check ground-level surfaces first: dented gutters, bruised fascia boards, dings on AC unit fins, and damage to window screens. These are reliable hail indicators because a storm hits every exposed surface at the same time. Check whether neighboring homes show similar damage; a consistent pattern across your street strengthens the case that a qualifying event occurred.
Then go into your attic. Daylight gaps, fresh water stains, or debris on the insulation confirm the damage has already penetrated the roof system. Write down the date and location of everything you find before you contact your insurer, because that detail becomes part of your claim record.
Once you've confirmed the damage qualifies as a covered event, your next job is to build a documented record that leaves nothing open to interpretation. Insurance adjusters work from evidence, and the more specific your documentation, the harder it is for an insurer to minimize or deny your claim. Weak documentation is one of the most common reasons homeowners lose money on legitimate claims, so treat this step as seriously as the inspection itself.
Thorough photo documentation is the single most controllable factor in how to get insurance to pay for roof replacement at full value rather than a reduced settlement.
Start at the ground level and work your way up. Capture every surface a hailstorm or wind event would hit: gutters, downspouts, fascia boards, window screens, siding, and AC unit fins. These secondary surfaces confirm that a damaging event occurred and corroborate what you found on the roof itself. Then photograph the roof surface systematically, moving slope by slope so nothing gets missed.

For each damaged area, take:
Date and time stamps matter here. Make sure your phone camera has location services and timestamps enabled before you start, so every image carries verifiable metadata your insurer can cross-reference against storm records.
Your photos tell part of the story, but a written log fills in the details photos can't capture alone. For each area you photograph, record the location on the roof (north slope, valley, ridge), the type of damage, and any measurements you can take safely from the ground or attic.
Use this simple log format:
| Location | Damage Type | Approximate Size | Photo File Name |
|---|---|---|---|
| North slope, row 3 | Hail bruising, granule loss | 1.5 in diameter | IMG_0042 |
| South gutter, east side | Dents along entire length | 24 ft run | IMG_0061 |
| Attic interior, NW corner | Fresh water stain on insulation | 18 x 12 in | IMG_0078 |
Organize your photos and log into a single folder labeled with your address and the storm date before you file anything. This makes it easy to hand everything to your contractor or adjuster without scrambling later.
Once your documentation is organized, contact your insurance company to open a claim. Most insurers let you file online, through their mobile app, or by calling the claims line directly. Have your policy number, storm date, and damage summary ready before you make contact, because the insurer will log everything you say as the official opening record. Stick to factual details and avoid speculating about repair costs or the cause of damage.
Filing promptly after a storm matters because most Texas policies set strict deadlines on how long you have to report damage after an event occurs.
When you file, request a claim number before you hang up or close the browser. That number is your reference for every conversation, email, and document that follows. During the filing call, give your insurer the storm date, damage type (hail, wind, or both), and confirm whether the roof is actively leaking so they can flag urgency. Do not accept any settlement offers or sign anything during this initial contact.
Use this checklist to confirm you covered everything before ending the call:
Texas law under the Texas Prompt Payment of Claims Act requires insurers to acknowledge your claim within 15 days and accept or deny it within 15 business days after receiving all requested documentation. Knowing this schedule gives you a clear benchmark to push back if your insurer goes quiet or stalls. Track every interaction from the moment you file.
Keep a running log in this format:
| Date | Action | Contact | Notes |
|---|---|---|---|
| Storm date | Damage observed | N/A | Photos taken |
| Claim filed | Spoke with rep | Name, ext. | Claim number recorded |
| Adjuster visit | Scheduled inspection | Adjuster name | Date confirmed |
| Documentation sent | Emailed photos and log | Adjuster email | Delivery confirmed |
Missing a response deadline from your insurer gives you grounds to escalate with the Texas Department of Insurance. Staying organized at this stage is one of the most practical things you can do in figuring out how to get insurance to pay for roof replacement without a process that drags on for months.
The adjuster inspection is one of the most important moments in how to get insurance to pay for roof replacement. Your adjuster's report directly determines what your insurer agrees to cover, and it happens in a single visit that typically lasts less than an hour. Going in unprepared means the adjuster controls the entire narrative, and gaps in their report are very hard to correct after the fact.
Having a roofing contractor present during the adjuster inspection gives you a second set of expert eyes and ensures nothing qualifying gets missed or dismissed.
Gather every piece of documentation you built in the previous steps and have it ready to hand over: your photo folder, damage log, and storm date verification such as a weather report or hail map for your zip code. You can pull historical storm data from the National Weather Service to confirm event dates and hail size in your area. Print a physical copy or organize a clean digital folder so you can walk the adjuster through your findings in sequence rather than scrolling through your phone on the spot.
Use this pre-inspection checklist:
Walk the roof with the adjuster rather than waiting on the ground. Adjusters sometimes spend only a few minutes on each slope, and a quick pass means some damage areas get overlooked entirely. Point out every item in your damage log and ask the adjuster to note each one in their report. If they dispute a mark, ask them specifically what category they are placing it in so you know exactly what to address in a follow-up.
Take notes during the walkthrough. Write down the adjuster's name, their employer, and every damage item they acknowledge verbally. If your contractor is present, ask them to document independently so you have two records to compare against the official scope once it arrives.
Once the adjuster submits their report, your insurer will send you a scope of loss, also called an estimate or adjuster report. This document lists every item the insurer agrees to cover, the unit cost they assign to each line, and the total payout they are proposing. Do not accept this number or sign any releases until a qualified roofing contractor reviews it against their own independent scope for the same damage.
Your insurer's scope should break down every damaged component on a line-by-line basis: shingle squares, underlayment, drip edge, flashing, ridge cap, and any other materials that require replacement. Each line carries a unit cost, a quantity, and an overhead and profit calculation. Overhead and profit (O&P) is a standard contractor cost that insurers sometimes exclude from initial estimates, even though it is a legitimate part of any professional roofing job. Ask your contractor specifically whether O&P appears in the insurer's scope before you compare the totals.
If your contractor's scope includes line items that the insurer's scope simply leaves blank, that gap is money the insurer owes you under your policy but did not include in the first offer.
Ask your contractor to produce their own written scope based on a physical inspection of the roof. Sit down with both documents side by side and go through them line by line. Use a comparison table like the one below to track every discrepancy:

| Line Item | Insurer Scope | Contractor Scope | Difference |
|---|---|---|---|
| Shingle squares (labor + material) | 18 squares | 22 squares | 4 squares missing |
| Drip edge replacement | Not included | 180 linear feet | Full line item missing |
| Overhead and profit | Not included | 10% | Missing from estimate |
| Underlayment | Partial | Full replacement | Undercounted |
Common gaps include undercounted squares, missing code-required upgrades, omitted flashing replacement, and excluded O&P. Each gap is a concrete item you can bring back to your insurer with your contractor's documentation as support. Understanding how to get insurance to pay for roof replacement at full value often comes down to this exact comparison, because the first scope your insurer sends is rarely the final number.
A low settlement offer or a partial denial does not close your claim. Your insurer's first number is a starting point, not a final decision, and Texas law gives you formal options to challenge it. Knowing how to get insurance to pay for roof replacement at full value often means being willing to dispute the initial scope with organized, documented evidence rather than accepting whatever arrives in the first offer letter.
Send a written dispute letter to your adjuster that references your contractor's scope line by line. Attach your photo documentation, storm verification, and the comparison table you built in Step 5. Keep your language factual and tied to specific line items rather than making general complaints about the total. Insurers respond to documentation, not frustration.
Use this dispute letter template as a starting point:
Subject: Claim Dispute - [Claim Number] - [Your Address]
Dear [Adjuster Name],
I am writing to formally dispute the scope of loss issued on [date] for claim number [claim number]. After a professional inspection by [Contractor Name], the following discrepancies were identified:
I have attached the contractor's written scope, supporting photographs, and storm verification records. Please review and issue a revised estimate within the timeframe required under the Texas Prompt Payment of Claims Act.
[Your Name]
[Policy Number]
[Contact Information]
If your written dispute does not produce a revised offer, request a re-inspection from a different adjuster or ask your insurer to invoke the appraisal clause. Most Texas homeowners policies include an appraisal process where both parties hire independent appraisers who agree on an umpire to settle unresolved differences. This is not litigation, and it typically moves faster than filing a formal complaint.
If your claim gets denied outright, file a complaint with the Texas Department of Insurance at tdi.texas.gov and consider hiring a licensed public adjuster to represent your position.
Document every phone call, email, and letter during this stage with dates and contact names. That paper trail becomes your strongest asset if the dispute escalates further and you need to demonstrate that your insurer failed to respond within the timelines Texas law requires.

You now have a complete roadmap for how to get insurance to pay for roof replacement, from confirming covered damage through disputing a low offer. The next move is to get a professional roof inspection before you file anything, because your documentation is only as strong as the evidence behind it. A thorough inspection gives you the specific damage details, photo records, and written scope that support every step in this guide. Without that foundation, gaps in your claim will work against you at every stage that follows.
At Defend Roofing, Chris and Greyson Buster conduct a 100+ photo Precision Roof Assessment on every project in the Central Texas area, giving you insurer-ready documentation and an honest repair-versus-replacement recommendation. Your adjuster gets a clear, organized record, and you get straightforward answers without any pressure to commit. Request your free roof assessment today and start your claim on solid ground.